SETUP GUIDEHow to set it up8 sections. Choose a role to highlight what matters to you.
Everyone
1What it is and why
What it is
An optional setup page for line matching policies at the item, vendor, or item and vendor level.
What you do here
Use this page to override the legal entity line matching policy with two-way or three-way matching for specific items, vendors or combinations, which then defaults onto purchase order lines.
Example
For example, a controller who requires two-way matching for most purchases sets three-way matching for an asset item, such as a CNC machine, so that its invoices are also matched with product receipts.
The page in Dynamics 365. page title tab to open what to set or check
About the examples: Examples and screenshots in this guide use BEAT, a demo company in a Dynamics 365 test environment. Use your own company's codes and values instead of copying them.
Step by step, with screenshots
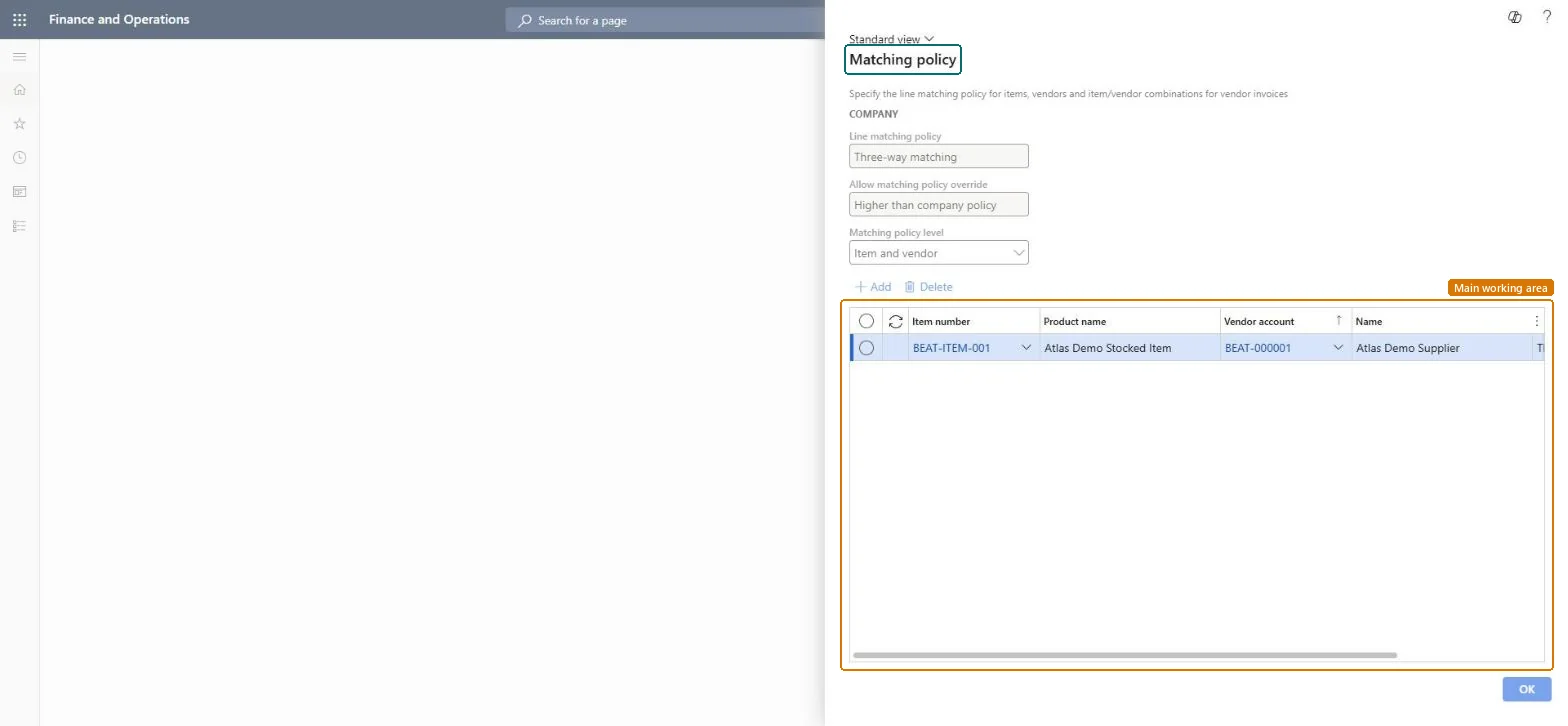
Set up Matching policy1 screen
Set up the two-way and three-way matching policies that apply to vendor invoices.
Screen 1
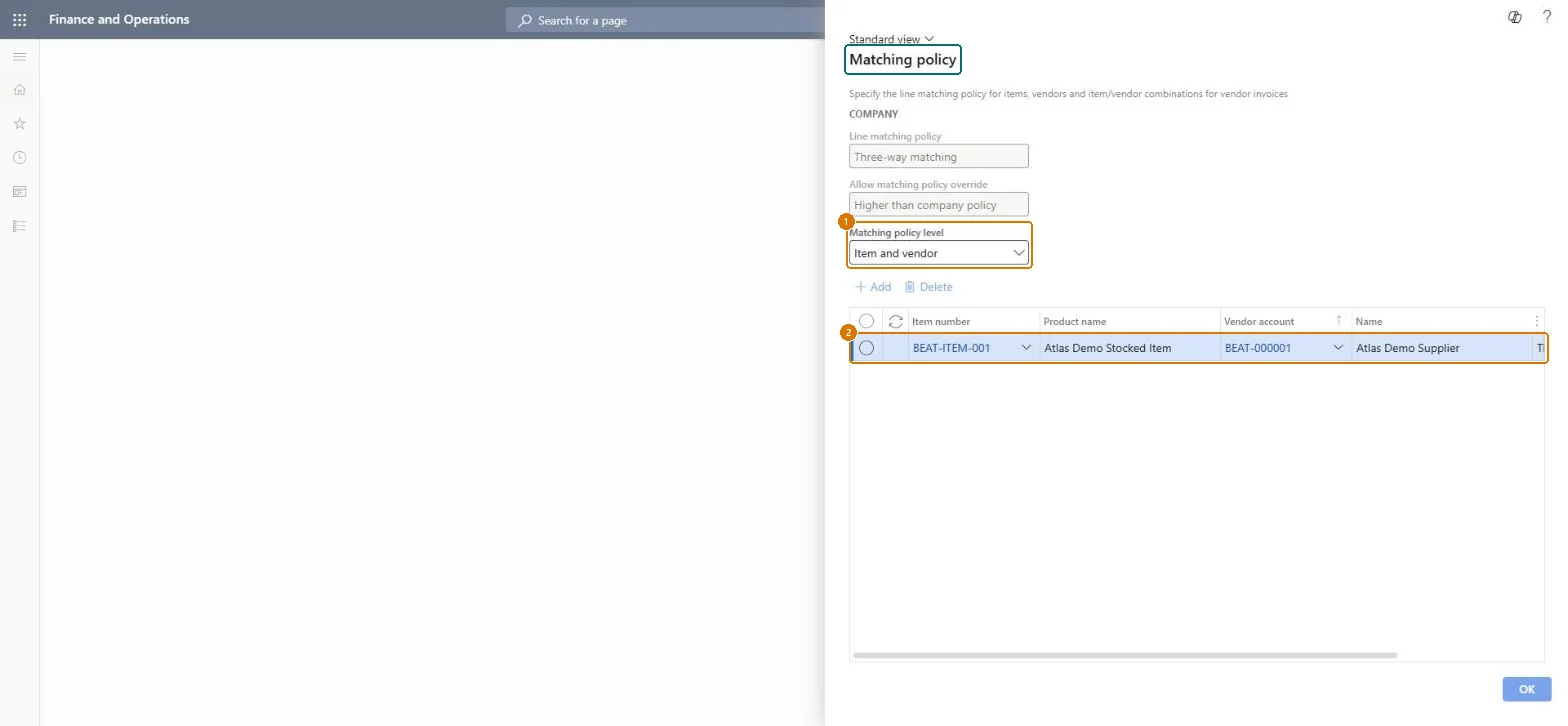
Set the matching policy for the item and vendor
Go to Accounts payable > Invoice matching setup > Matching policy
Check the company Line matching policy and Allow matching policy override
Set Matching policy level
Select Add and enter the item and vendor
Select OK
1Matching policy level
Item and vendor
2Item number
BEAT-ITEM-001
Vendor account
BEAT-000001
Show the full screen page title tab to open what to set or check
Steps from Microsoft
Go to Accounts payable > Invoice matching setup > Matching policy.
Select the Matching policy level: Item and vendor, Item, or Vendor.
Set two-way or three-way matching for the items, vendors, or item and vendor combinations that need a policy different from the legal entity default.
The level the policy applies to: specific items from specific vendors, specific items from any vendor, or all items from specific vendors.Microsoft Learn
Item and vendor
Item number
BEAT-ITEM-001
Vendor account
BEAT-000001
Test checklist
Set the legal entity policy to Two-way match and allow override.
Add an Item row with Three-way match for a stocked item.
Create a purchase order with that item and another item; check the line policies are Three-way and Two-way.
Invoice the stocked item without a product receipt and check a quantity discrepancy is shown.
Set the legal entity Line matching policy in Accounts payable parameters, and use this page only for items, vendors or item and vendor combinations that need a different policyThe legal entity policy applies to everything not listed here; the page adds more granular defaults that are resolved item and vendor first, then item, then vendor.
Reversible: The page sets the default Matching policy on purchase order lines, so a change applies to lines created afterwards.
If you change it later
The policy is chosen in a fixed order: item and vendor first, then item, then vendor, and finally the legal entity default from Accounts payable parameters. Microsoft Learn
Technical architect
6Technical
Menu item
PurchLineMatchingPolicyChecked in Dynamics 365
Form
PurchLineMatchingPolicyChecked in Dynamics 365
Roles to set it up and use it
To set it up or change itAccounts payable manager VendInvoiceAccountsPayableManagerAccounting supervisor LedgerAccountingSupervisorPurchasing manager TradePurchasingManagerTo use itAccounting manager LedgerAccountingManagerAccounts payable clerk VendInvoiceAccountsPayableClerkAuditor AuditPolicyManagerRental manager RentalManagerGive people one of these roles. On this system, 7 roles can open this page.Checked in Dynamics 365
Checked in a working Dynamics 365 system, version 10.0.49: the menu item, form, table and security, the page, the demo records and the values in the screenshots.
To cite this step: AP-MATCHSETUP-030, Set up Matching policy. Beyond ERP Atlas Hub, 2026-11-11. https://www.beyonderp.cloud/atlas/step/AP-MATCHSETUP-030