Setup page · Accounts payable
Matching policy
An optional setup page for line matching policies at the item, vendor, or item and vendor level.
- Used by
- —
- Business process
- Perform invoice matching in Dynamics 365 Finance
- Menu item
PurchLineMatchingPolicy- Main table
- —
- Data entity
- —
- Setup steps
- 1 on this page
Show what matters for
Everyone
1What it is and why
| What it is | An optional setup page for line matching policies at the item, vendor, or item and vendor level. |
|---|---|
| What you do here | Used to override the legal entity line matching policy with two-way or three-way matching for specific items, vendors or combinations, which then defaults onto purchase order lines. |
| Example | For example, a controller who requires two-way matching for most purchases sets three-way matching for an asset item, such as a CNC machine, so that its invoices are also matched with product receipts. |
Functional consultant · Solution architect
2Where it fits
| Business process | Manage accounts payable › Process supplier invoices › Perform invoice matching in Dynamics 365 Finance |
|---|---|
| Menu path | Accounts payable › Invoice matching setup › Matching policy |
| Set up first | Accounts payable parameters Microsoft Learn ↗ |
| Used next by | All purchase orders Microsoft Learn ↗ |
| Related pages | Price tolerances Microsoft Learn ↗Invoice totals tolerances Microsoft Learn ↗Item price tolerance groups Microsoft Learn ↗Vendor price tolerance groups Microsoft Learn ↗Charges tolerances Microsoft Learn ↗ |
End user · Functional consultant
3How to do it
Step by step, with screenshots
Set up Matching policy1 screen
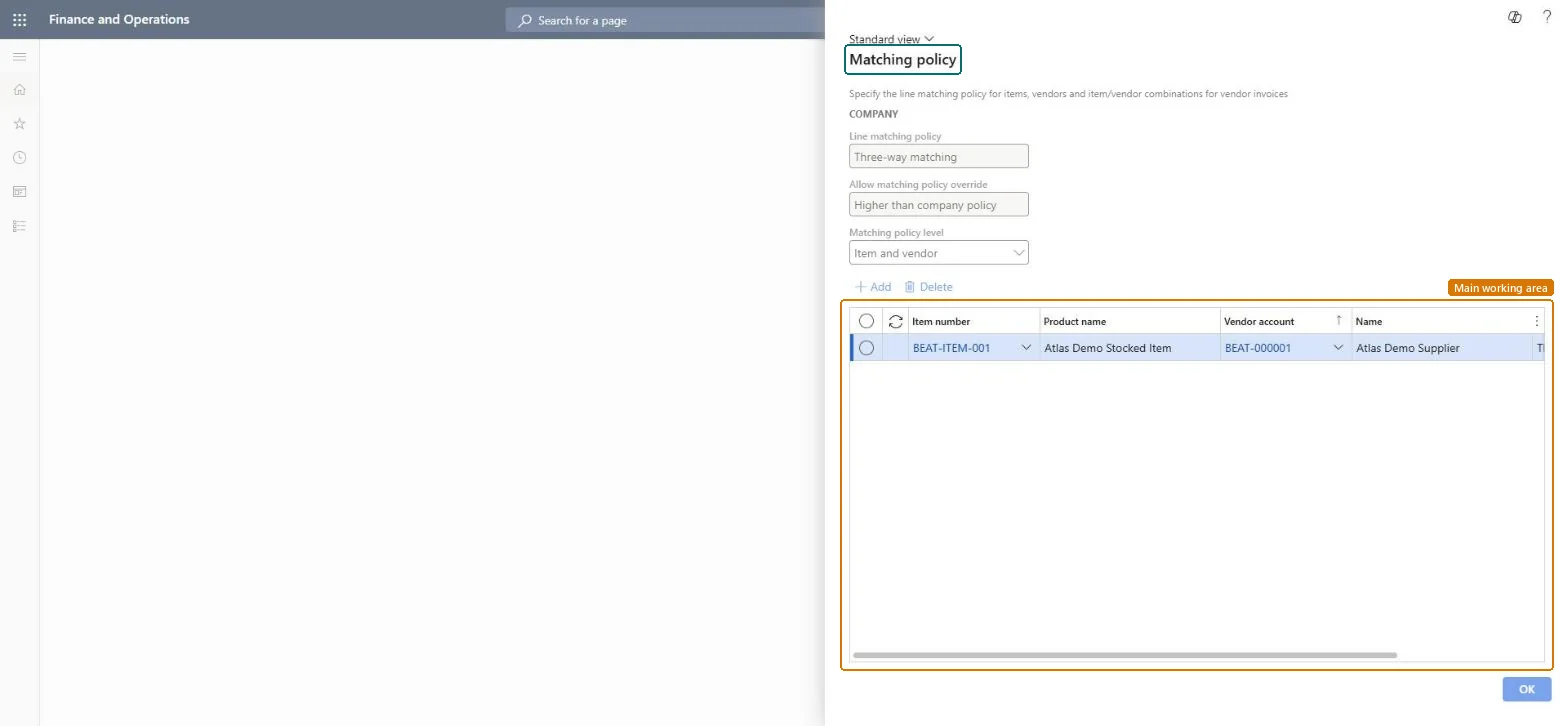
Set up the two-way and three-way matching policies that apply to vendor invoices.
Screen 1
Set the matching policy for the item and vendor
Go to Accounts payable > Invoice matching setup > Matching policy
- Check the company Line matching policy and Allow matching policy override
- Set Matching policy level
- Select Add and enter the item and vendor
- Select OK
1Matching policy level Item and vendor 2Item number BEAT-ITEM-001 Vendor account BEAT-000001 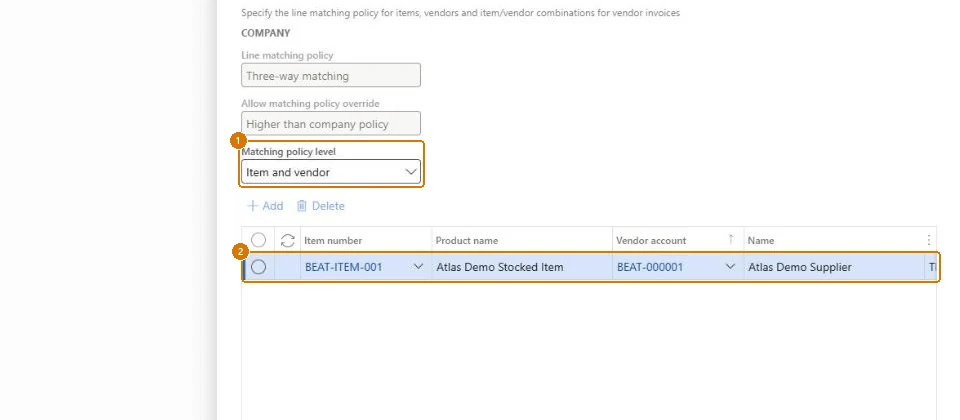
Show the full screen
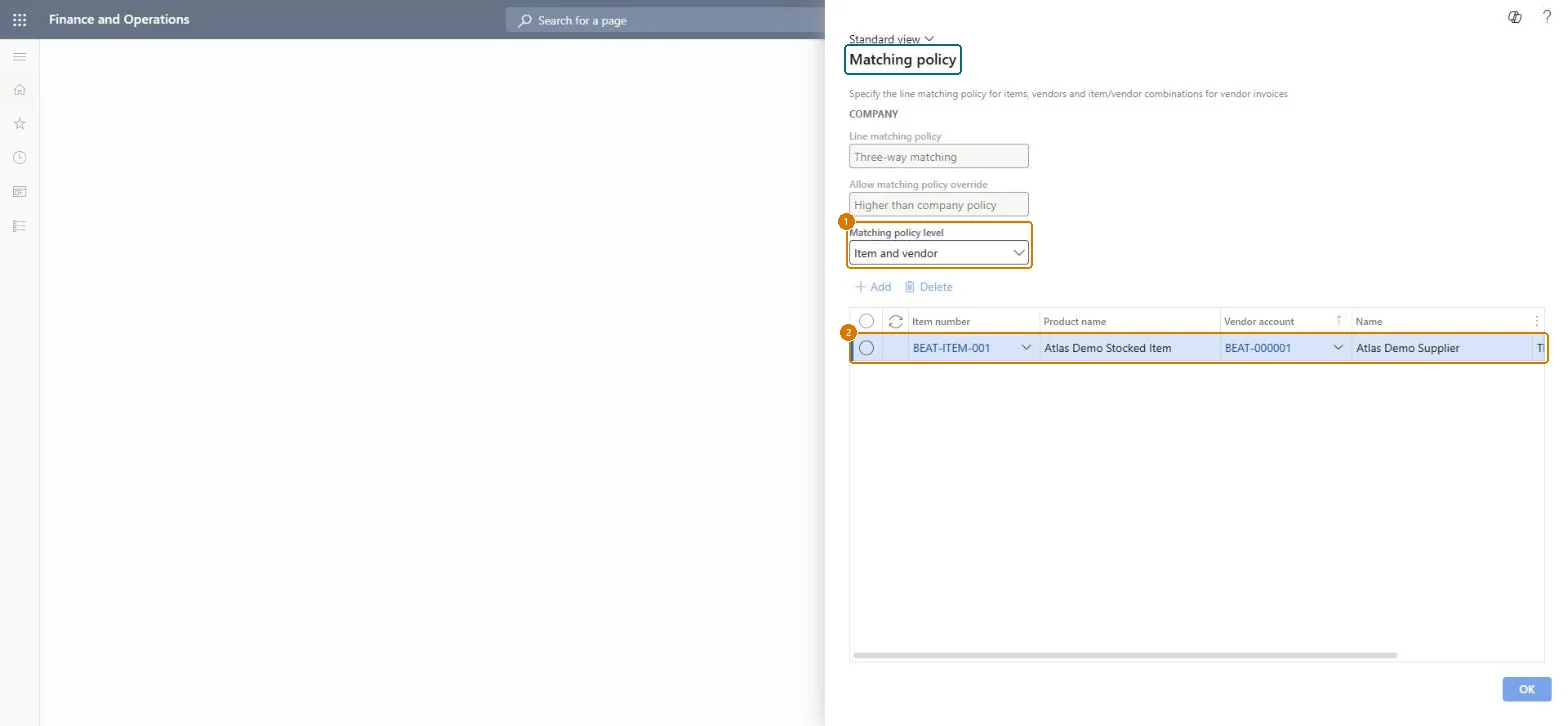
page title tab to open what to set or check
Microsoft's steps
- Go to Accounts payable > Setup > Invoice matching setup > Matching policy.
- Select the Matching policy level: Item and vendor, Item, or Vendor.
- Set two-way or three-way matching for the items, vendors, or item and vendor combinations that need a policy different from the legal entity default.
Source: Microsoft Learn ↗
Field guide
| Field | What it means | Worked example | Table column |
|---|---|---|---|
| Matching policy level | The level the policy applies to: specific items from specific vendors, specific items from any vendor, or all items from specific vendors.Microsoft Learn ↗ | Item and vendor | — |
| Item number | — | BEAT-ITEM-001 | — |
| Vendor account | — | BEAT-000001 | — |
Functional consultant
4Setup decisions
| Setup step | Recommended value and why | Decision · common mistake · test |
|---|---|---|
| Set up Matching policy | — | — |
Solution architect
5Design impact
| Shared or per company | — |
|---|---|
| Can it be undone | — |
| Feature or country | — |
| If you change it later | The policy is chosen in a fixed order: item and vendor first, then item, then vendor, and finally the legal entity default from Accounts payable parameters. Microsoft Learn ↗ |
Technical architect
6Technical
| Menu item | PurchLineMatchingPolicy Checked in Dynamics 365 |
|---|---|
| Form | PurchLineMatchingPolicy Checked in Dynamics 365 |
| Table | — |
| Data entities | — |
| Who can open it | — |
| Actions on the page | — |
Developer
7Developer
| Open it directly | https://<your-environment>/?mi=PurchLineMatchingPolicy |
|---|---|
| Integrate with | — |
| Table definition | — |
Everyone
8Sources and checks
- learn.microsoft.com/dynamics365/finance/accounts-payable/tasks/set-up-accounts-payable-invoice-matching-validation
- learn.microsoft.com/dynamics365/finance/accounts-payable/accounts-payable-overview#optional-setup-pages-for-accounts-payable
- learn.microsoft.com/dynamics365/finance/accounts-payable/tasks/set-up-accounts-payable-invoice-matching-validation
- learn.microsoft.com/dynamics365/finance/accounts-payable/accounts-payable-overview
- Checked in a working Dynamics 365 system, version 10.0.49: the menu item, form, table and security, the page, the demo records and the values in the screenshots.