Setup step on the Legal entities page · Organization administration
Set up Legal entities
Use this page to create a legal entity and record its general details, addresses, contact information, registration and tax numbers, bank accounts and other company settings.
SETUP GUIDEHow to set it up8 sections. Choose a role to highlight what matters to you.
Everyone
1What it is and why
What it is
A list page of legal entities, the organizations with a registered or legislated legal structure that can sign contracts and must report on their performance.
What you do here
Use this page to create a legal entity and record its general details, addresses, contact information, registration and tax numbers, bank accounts and other company settings.
Example
For example, a company that trades can own subsidiary legal entities, with a separate virtual legal entity set up to consolidate their results.
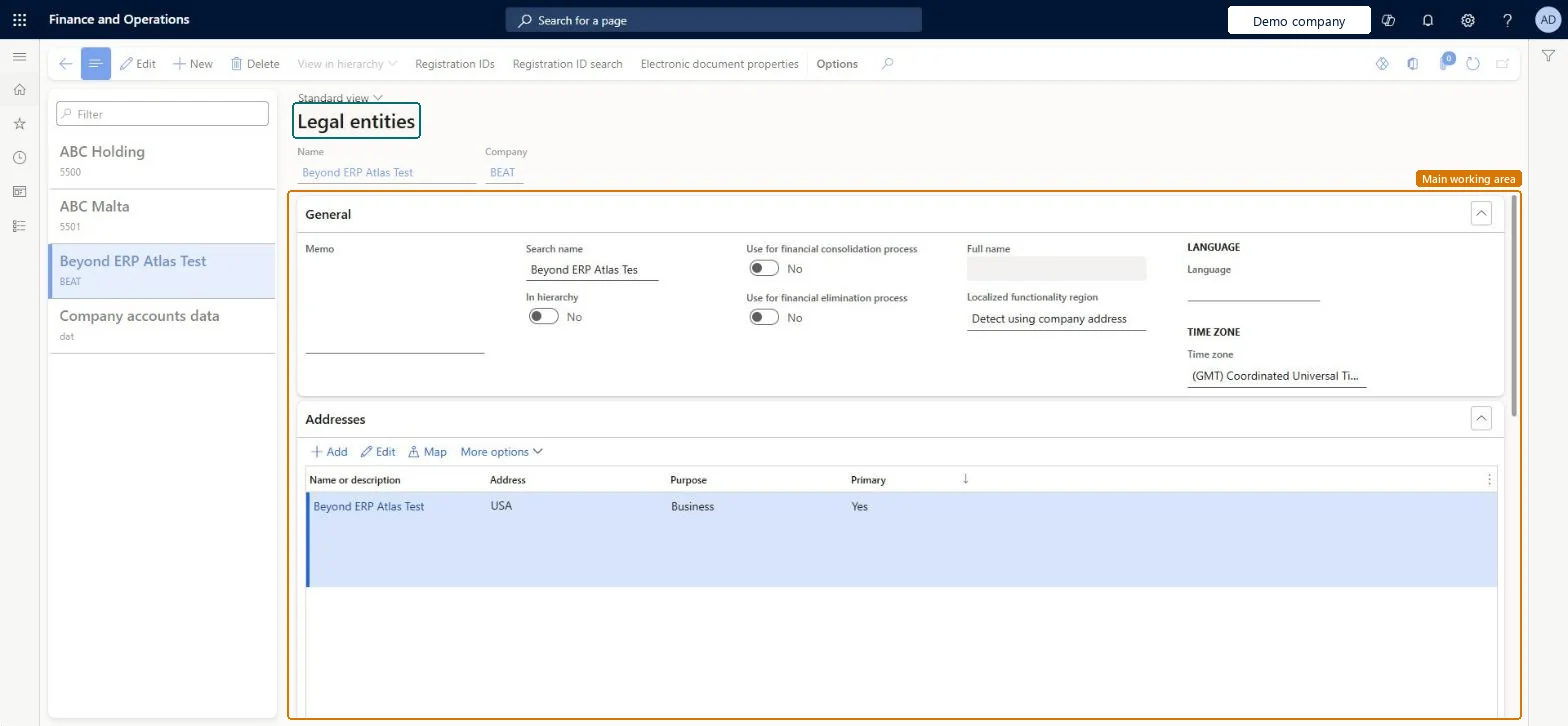
The page in Dynamics 365. page title tab to open what to set or check
About the examples: Examples and screenshots in this guide use BEAT, a demo company in a Dynamics 365 test environment. Use your own company's codes and values instead of copying them.
Step by step, with screenshots
Set up Legal entities1 screen
Use this page to create a legal entity and record its general details, addresses, contact information, registration and tax numbers, bank accounts and other company settings.
Screen 1
Check the demo legal entity
Go to Organization administration > Organizations > Legal entities
Select the legal entity in the list
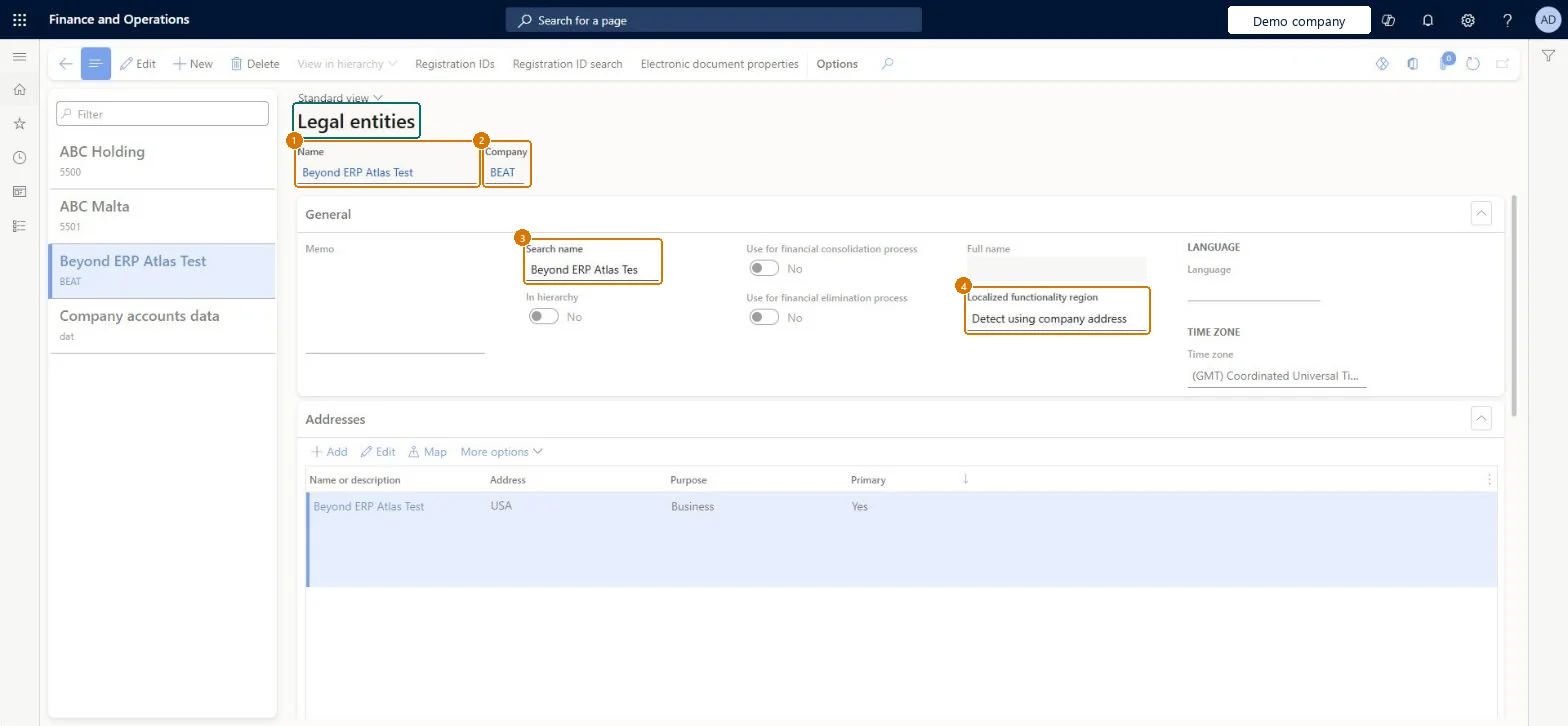
Read its name and company ID
Expand General to read the search name and localization region
1Name
Beyond ERP Atlas Test
2Company
BEAT
3Search name
Beyond ERP Atlas Tes
4Localized functionality region
Detect using company address
Show the full screen page title tab to open what to set or check
Steps from Microsoft
Go to Organization administration > Organizations > Legal entities.
Select New.
In the Name field, enter the legal entity name.
In the Company field, enter the company ID.
In the Country/region field, select the country or region.
Select OK.
Fill in the General, Addresses and Contact information sections.
Enter registration numbers in the Statutory reporting, Registration numbers and Tax registration sections.
Add bank accounts in the Bank account information section.
Set the correct country/region on the primary address when the legal entity is created, before any transactions are posted.The country/region of the primary address controls which localization features, such as tax rules and statutory reporting, are available to the legal entity.
One-way: Warning: After financial transactions are posted for the legal entity, the country/region of its primary address can't be changed in the application. A correction needs Microsoft Support and product team approval, and for a legal entity registered in Denmark it isn't allowed at all; the only option is a new legal entity.
If you change it later
The Company ID can't be changed after the legal entity is created, so plan the naming before you create it. Microsoft Learn
Technical architect
6Technical
Menu item
OMLegalEntitiesChecked in Dynamics 365
Form
OMLegalEntityChecked in Dynamics 365
Table
CompanyInfoShown as “Legal entities” in Record infoChecked in Dynamics 365
To set it up or change itInformation technology manager SysServerITManagerProduction manager ProdProductionManagerAccounting manager LedgerAccountingManagerRental manager RentalManagerBudget manager BudgetBudgetManagerTo use itHuman resource manager HcmHumanResourceManagerHuman resource assistant HcmHumanResourceAssistantRental coordinator agent RentalCoordinatorAgentFinancial controller LedgerFinancialControllerAccountant LedgerAccountantGive people one of these roles. On this system, 25 roles can open this page.Checked in Dynamics 365
Checked in a working Dynamics 365 system, version 10.0.49: the menu item, form, table and security, the page, the demo records and the values in the screenshots.
To cite this step: OA-ORG-010, Set up Legal entities. Beyond ERP Atlas Hub, 2026-11-11. https://www.beyonderp.cloud/atlas/step/OA-ORG-010