About the examples: Examples and screenshots in this guide use BEAT, a demo company in a Dynamics 365 test environment. Use your own company's codes and values instead of copying them.
Step by step, with screenshots
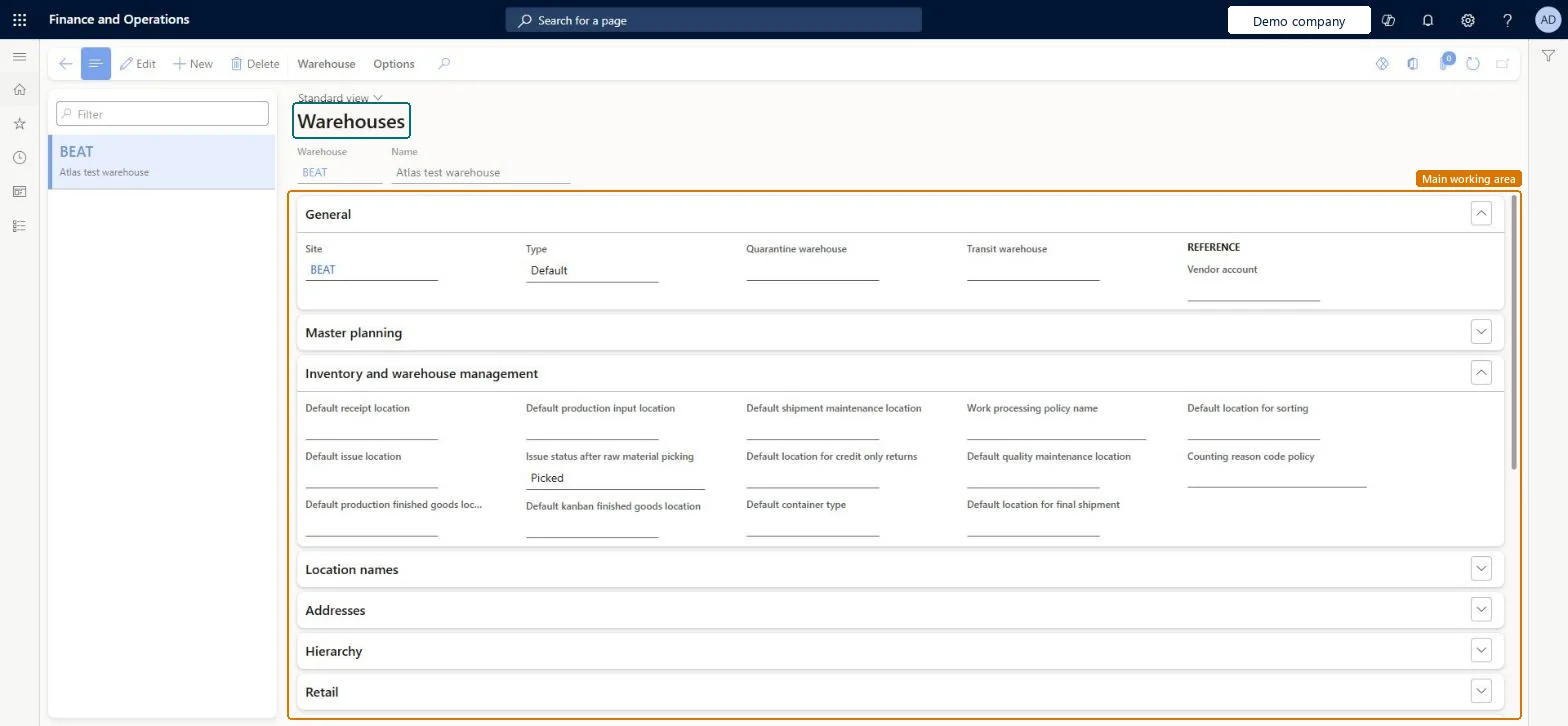
Set up Warehouses1 screen
Use this page to control and separate warehouse operations, because many parameters and policies are set for each warehouse.
Screen 1
Create a warehouse
Go to Inventory management > Setup > Inventory breakdown > Warehouses
Make sure the site exists (here demo site BEAT)
Select New
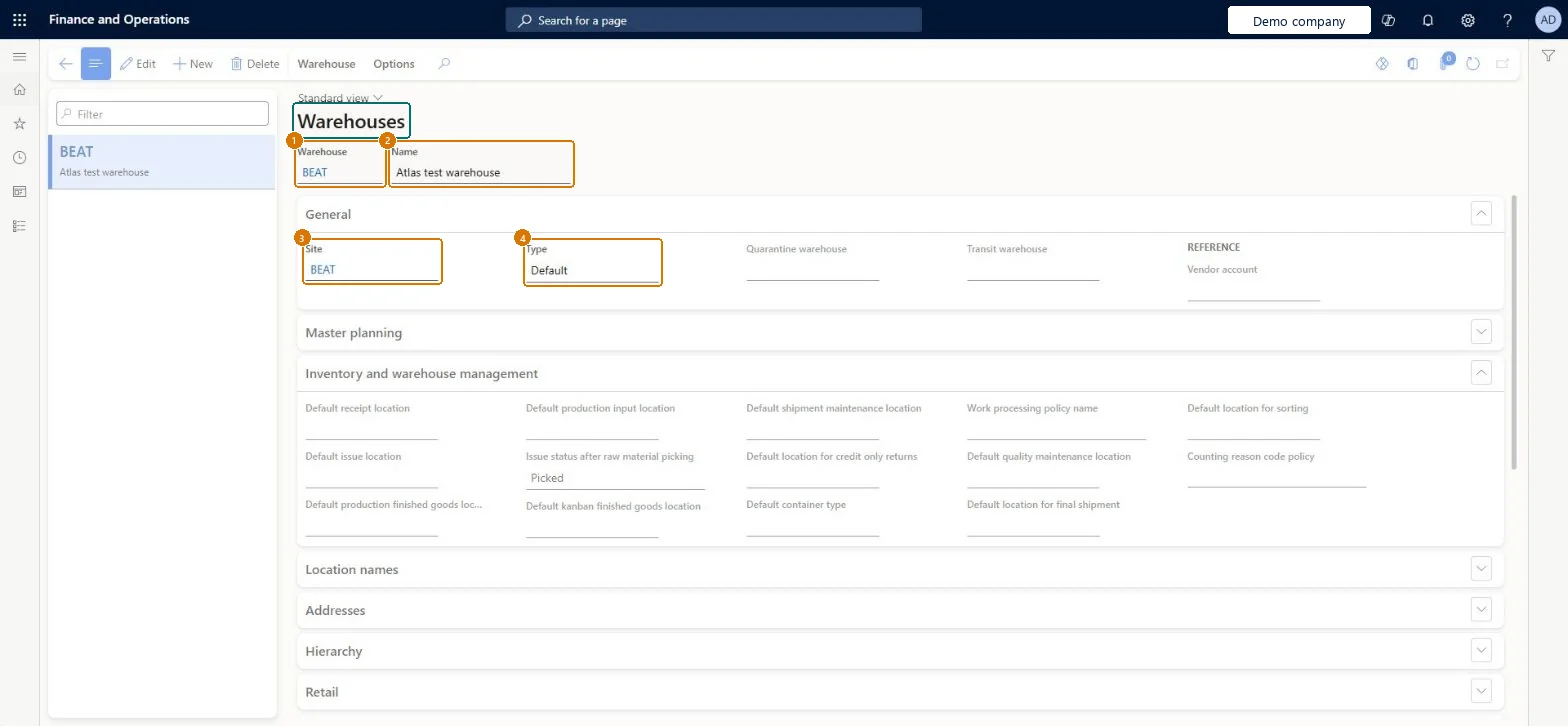
Enter the warehouse code and name
Select the site and the warehouse type (Default, Quarantine or Transit)
Optionally fill in the default locations and the counting reason code policy
Select Save
1Warehouse
BEAT
2Name
Main warehouse
3Site
BEAT
4Type
Default
Show the full screen page title tab to open what to set or check
Steps from Microsoft
Go to Inventory management > Setup > Inventory breakdown > Warehouses.
Select New.
Enter the Warehouse ID and Name, and select the Site.
In the Location names section, set which coordinates to include, such as aisle, rack and shelf, and their format.
On the Action Pane, select Warehouse, and then select Location Wizard.
Choose the location types to create and select Next until you can select Finish.
One Default warehouse per physical place or function, a Quarantine warehouse attached where quarantine is used, and a Transit warehouse for transfer ordersLearn describes the three warehouse types: Quarantine warehouses attach to Default warehouses and receive quarantine-controlled purchases, and Transit warehouses are used for transfer orders.
Using a warehouse as the financial inventory dimension. Learn advises against it; create separate sites instead.
Hard to reverse: Warehouse settings can be edited, but every item transaction is attached to a warehouse and follows it through the system, so restructuring warehouses after go-live means moving inventory.
If you change it later
A whole warehouse can't be blocked or closed for future transactions here; rename it or block its locations instead. Microsoft Learn
Technical architect
6Technical
Menu item
InventLocationsChecked in Dynamics 365
Form
InventLocationChecked in Dynamics 365
Table
InventLocationShown as “Warehouses” in Record infoKey field: InventSiteId, InventLocationIdChecked in Dynamics 365
PrivilegesMaintain warehouses InventLocationsMaintainView warehouses InventLocationsViewDutiesEnable master scheduling process ReqMasterSchedulingProcessEnableInquire into warehouse operation master WMSWarehouseOperationMasterInquireMaintain warehouse operation master WMSWarehouseOperationMasterMaintain8 security rolesField Service Integration User FieldServiceIntegrationUserMaterials manager InventMaterialsManagerProduction manager ProdProductionManagerProduction supervisor ProdProductionSupervisorProcess engineer RouteProcessEngineerProcess engineering manager RouteProcessEngineeringManagerWarehouse planner WHSWarehousePlannerWarehouse manager WMSWarehouseManagerChecked in Dynamics 365
Roles to set it up and use it
To set it up or change itWarehouse manager WMSWarehouseManagerProcess engineer RouteProcessEngineerTo use itMaterials manager InventMaterialsManagerProduction supervisor ProdProductionSupervisorProduction manager ProdProductionManagerField Service Integration User FieldServiceIntegrationUserWarehouse planner WHSWarehousePlannerGive people one of these roles. On this system, 8 roles can open this page.Checked in Dynamics 365
Actions on the page
Warehouse: Maintain, Set up, ViewOptions: Personalize, Page options, ShareChecked in Dynamics 365
InventWarehouseEntity (Warehouses): loaded for each company, in Microsoft's default template 300 - Inventory.Load order: Microsoft's default template 300 - Inventory loads Warehouses at execution unit 1, level 300, sequence 50. Lower levels load first, and entities at the same level load in sequence order.Load first: Calendar, Inventory status, Container types V2, Vendors V2, the default templates at lower levels (System setup to Budgeting)Microsoft Learn
Checked in a working Dynamics 365 system, version 10.0.49: the menu item, form, table and security, the page, the demo records and the values in the screenshots.
To cite this step: IM-SETUP-250, Set up Warehouses. Beyond ERP Atlas Hub, 2026-11-11. https://www.beyonderp.cloud/atlas/step/IM-SETUP-250