Roll out the Expense management workspace to employees
Expense managementWorkspaces
ExpenseWorkspace
Business process
Manage time and attendance
Menu item
ExpenseWorkspace
Data entity
None for this page's own settings
Setup steps
1 on this page
Show what matters for
SETUP GUIDEHow to set it up8 sections. Choose a role to highlight what matters to you.
Everyone
1What it is and why
What it is
A workspace that is the main place where employees file their expenses and create and submit expense reports.
What you do here
Use this workspace to create and submit expense reports and to work with unattached expenses and receipts from one page.
Example
For example, an employee checks the unattached receipts and imported card expenses, then selects New expense report and adds both, so the receipts are matched to the expenses automatically.
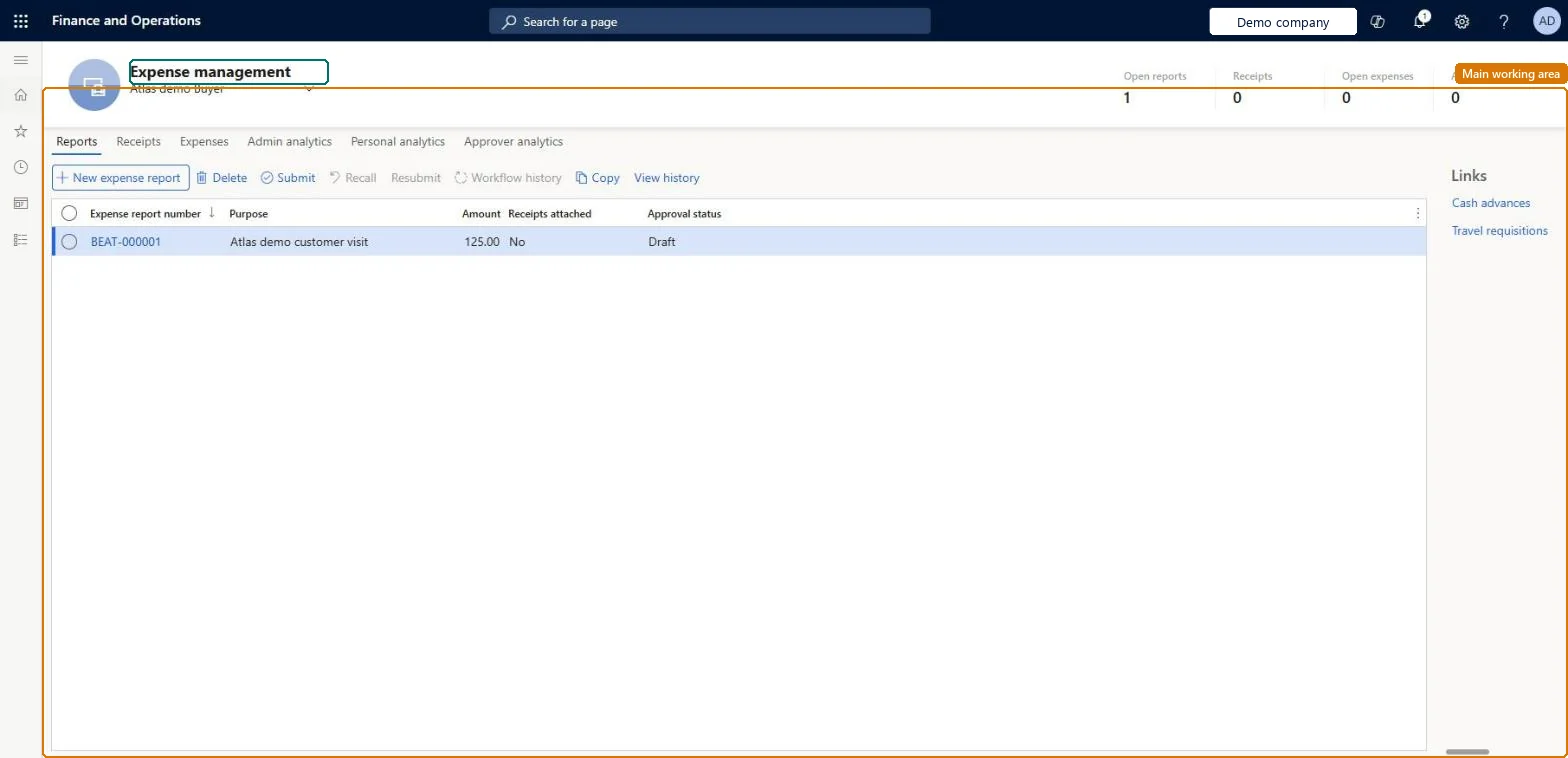
The page in Dynamics 365. page title tab to open what to set or check
About the examples: Examples and screenshots in this guide use BEAT, a demo company in a Dynamics 365 test environment. Use your own company's codes and values instead of copying them.
Setup steps on this page
Roll out the Expense management workspace to employees
Decide which expense experience employees use and what they see first in the workspace.
Steps from Microsoft
Go to Expense management > Workspaces > Expense management.
Select New expense report.
In the Title/Purpose field, enter or select the purpose of the report.
Enter the Location where the expenses happened, and then select Create.
On the Expenses tab, select New expense.
Select the Category, and enter the Amount, Currency, Date and Merchant from the receipt.
Select Save and new to add another expense, or Save to return to the report.
The tab that lists unattached receipts, where you can also upload new receipts.Microsoft Learn
Expenses
The tab that lists unattached expenses, such as card transactions imported by the expense administrator.Microsoft Learn
Common errors and fixes
Message
What to do
You do not have access to enter expenses because you are not mapped to an employee record. Contact your manager or support team for assistance.
Link the user to an employee with active employment and set a company on the user account. In the live system the pages under My expenses, Process expense reports and Process cash advances showed this message for a user with no employee record. Checked in Dynamics 365
The old workspace still opens
Both Expense reports reimagined and Expense reports reimagined enhancements must be on in Feature management. Turn them on and open the workspace again. Microsoft Learn
An employee doesn't see an imported card transaction
The card number in the file must match a card on the employee's worker record (Expense > Credit cards), and the card type must match a credit card type in setup. Correct the setup and import again, or reassign the transaction. Microsoft Learn
Test checklist
Turn on Expense reports reimagined and Expense reports reimagined enhancements in Feature management.
Sign in as a user linked to an employee, open the workspace and upload a receipt on the Receipts tab.
Select New expense report, enter a purpose and location, and add the unattached receipt and one unattached expense.
Check that the receipt is matched to the expense and that the report shows the total of the lines.
Turn on Expense reports reimagined together with Expense reports reimagined enhancements, and the per diem feature if per diems are used. Train employees to start every report from the workspace, adding unattached receipts and card expenses when they create it.The base feature brings the workspace, receipt matching and field visibility; the enhancements feature adds workflow history, line-level workflows, mapping to travel requisitions and interim and final approvers. Adding receipts and expenses when the report is created matches them automatically.
Expense reports reimagined (Must be on)Expense reports reimagined enhancements (Recommended)Per-diem for expense report re-imagined interface (Optional)Automatch and create expense from receipt (Optional)
Licence or add-in
In this system Employee and Contractor enter their own expenses, and Expense administrator sets up the module and processes documents. The expense mobile app needs the Employee role, a company on the user account and a link to an employee with active employment. Every employee who files expenses uses this workspace.
Per company: the workspace shows the signed-in employee's own expenses, receipts and reports in their current legal entity. A delegate also sees the expenses of the people who delegated to them. Microsoft Learn
Can it be undone
Reversible: Features in Feature management can be turned off again; documents entered stay.
If you change it later
Turning on Expense reports reimagined and Expense reports reimagined enhancements in Feature management replaces the earlier expense workspace with this one and adds the Expense fields visibility page. No existing menu items are removed, and review and approval still open the classic expense report page. Per diems in this workspace need the Per-diem for expense report re-imagined interface feature. Microsoft Learn
Technical architect
6Technical
Menu item
ExpenseWorkspaceChecked in Dynamics 365
Data entities
TrvExpTransEntityExpenses (the expense lines shown on the Expenses tab; the workspace itself has no data entity) Microsoft data model
Roles to set it up and use it
To set it up or change itExpense administrator ExpenseAdministratorContractor HcmContractorEmployee HCMEmployeeGive people one of these roles. On this system, 3 roles can open this page.Checked in Dynamics 365
Developer
7Developer
Open it by URL
https://<your-environment>/?mi=ExpenseWorkspace
Data migration
Load order: The workspace has no data entity in Data management, so it can't be loaded from a file or a configuration template. It shows expenses, receipts and reports that are created by employees or imported from card files, so move open expense reports and card transactions with their own pages and entities.Microsoft Learn
Checked in a working Dynamics 365 system, version 10.0.49: the menu item, form, table and security, the page.
To cite this step: EM-WS-010, Roll out the Expense management workspace to employees. Beyond ERP Atlas Hub, 2026-11-11. https://www.beyonderp.cloud/atlas/step/EM-WS-010