Business Performance Planning app role, Data management administrator, Data management migration user and 3 more roles
Business process
Develop people strategy
Menu item
TrvAdminCustomFields
Main table
TrvAdminCustomFields
Data entity
TrvExpenseReportFieldEntity
Setup steps
1 on this page
Show what matters for
SETUP GUIDEHow to set it up8 sections. Choose a role to highlight what matters to you.
Everyone
1What it is and why
What it is
A setup page where you choose which fields appear on an expense report and whether they are read-only.
What you do here
Use this page to control the header and line fields shown on expense reports in the original expense experience.
Example
For example, while the company still uses the classic expense report page, the administrator sets Location to display on the header and Purpose to read-only on lines, and financial dimensions to show so they also appear in the mobile app.
The page in Dynamics 365. page title tab to open what to set or check
About the examples: Examples and screenshots in this guide use BEAT, a demo company in a Dynamics 365 test environment. Use your own company's codes and values instead of copying them.
Step by step, with screenshots
Set up Expense report fields1 screen
Choose the header and line fields shown on the classic expense report page.
Screen 1
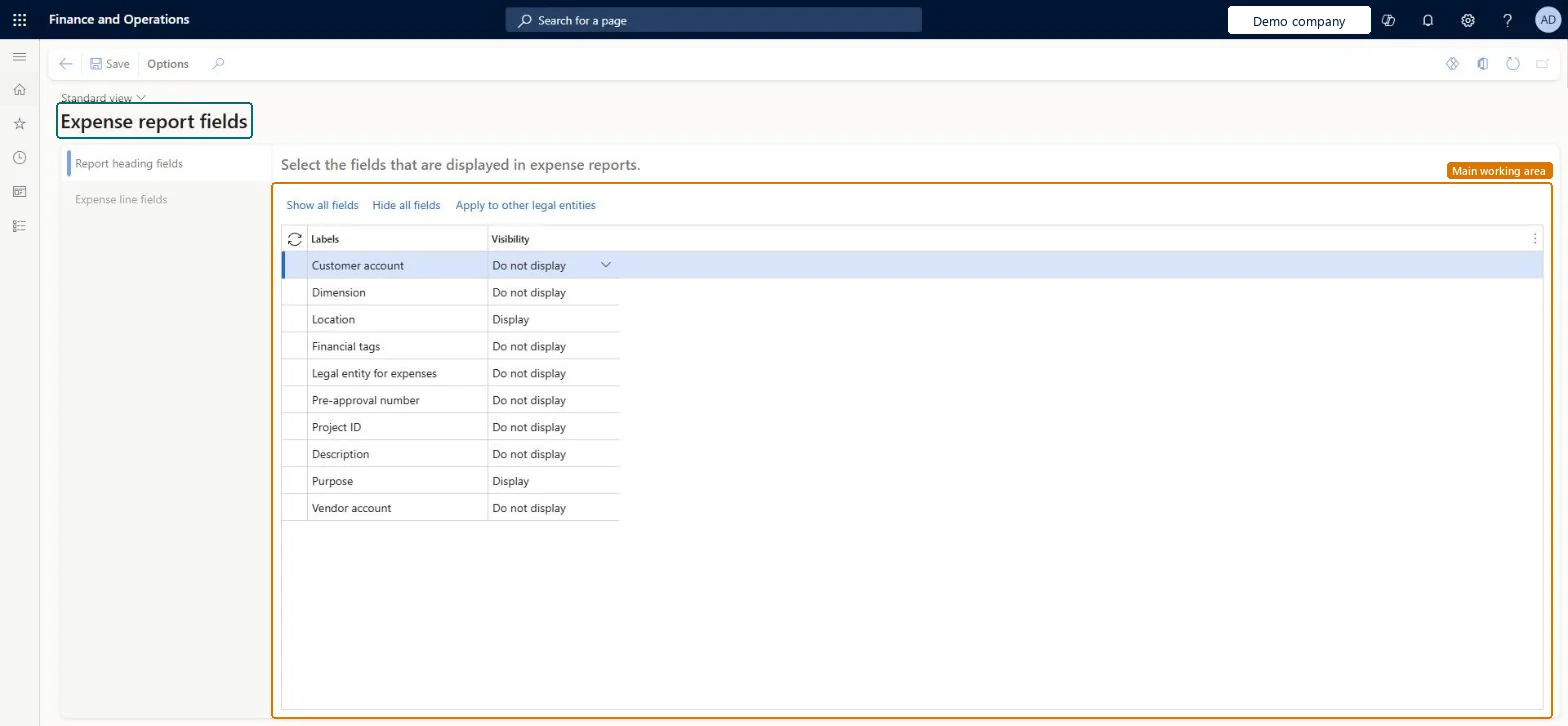
Choose the fields shown on expense reports
Go to Expense management > Setup > General > Expense report fields
Open the page and stay on the Report heading fields tab
Set Visibility to Display or Do not display for each field
Select the Expense line fields tab and do the same for the line fields
Select Save
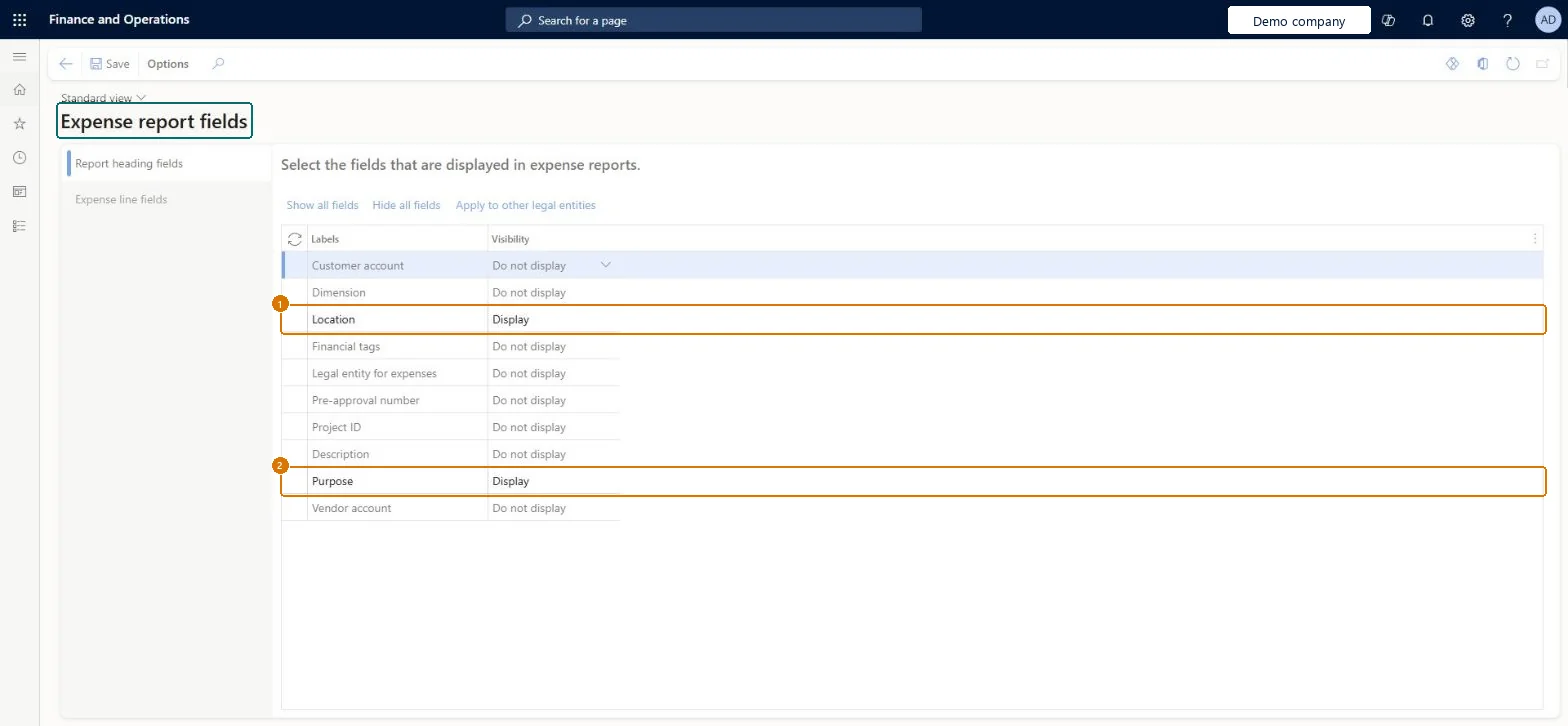
1Location
Display
2Purpose
Display
Show the full screen page title tab to open what to set or check
Steps from Microsoft
Go to Expense management > Setup > General > Expense report fields.
Find the field on the expense report header or line.
Choose whether it is displayed and whether it is read-only.
Save, then open an expense report on the classic page and check the field.
Show only the fields your policy needs, make derived fields read-only, and display Dimensions when employees must enter financial dimensions.Fewer fields make entry quicker; the same settings control what the expense mobile app shows when the reimagined experience is off.
In this system Employee and Contractor enter their own expenses, and Expense administrator sets up the module and processes documents. The expense mobile app needs the Employee role, a company on the user account and a link to an employee with active employment. The expense administrator maintains this page for the classic experience; the reimagined experience uses Expense fields visibility instead.
PrivilegesMaintain expense management EP display fields TrvAdminCustomFieldsMaintainView expense management EP display fields TrvAdminCustomFieldsViewDutiesMaintain Master entity data for data management DataManagementApplicationMasterEntitiesMaintainView Master entity data for data management DataManagementApplicationMasterEntitiesViewEnable expense management process TrvTravelAndExpenseProcessEnableInquire into expense management reference data TrvTravelAndExpenseReferenceDataInquire6 security rolesBusiness Performance Planning app role BPPBudgetPlanningAppRoleData management administrator DataManagementAdministratorData management migration user DataManagementMigrationUserExpense administrator ExpenseAdministratorDemand planning app role ScpDemandPlanningAppRoleInformation technology manager SysServerITManagerChecked in Dynamics 365
Roles to set it up and use it
To set it up or change itExpense administrator ExpenseAdministratorInformation technology manager SysServerITManagerBusiness Performance Planning app role BPPBudgetPlanningAppRoleData management migration user DataManagementMigrationUserDemand planning app role ScpDemandPlanningAppRoleGive people one of these roles. On this system, 6 roles can open this page.Checked in Dynamics 365
Actions on the page
Options: Personalize, Page options, Edit, ShareChecked in Dynamics 365
TrvExpenseReportFieldEntity (Display fields): shared by all companies, in Microsoft's default template 600 - Expense.Load order: Microsoft's default template 600 - Expense loads Display fields at execution unit 1, level 30, sequence 10. Lower levels load first, and entities at the same level load in sequence order.Load first: the default templates at lower levels (System setup to General ledger)Microsoft Learn
Checked in a working Dynamics 365 system, version 10.0.49: the menu item, form, table and security, the page, the demo records and the values in the screenshots.
To cite this step: EM-SETUP-050, Set up Expense report fields. Beyond ERP Atlas Hub, 2026-11-11. https://www.beyonderp.cloud/atlas/step/EM-SETUP-050