BeyondERP.Newsletter
Menu

Setup page · Credit and collections

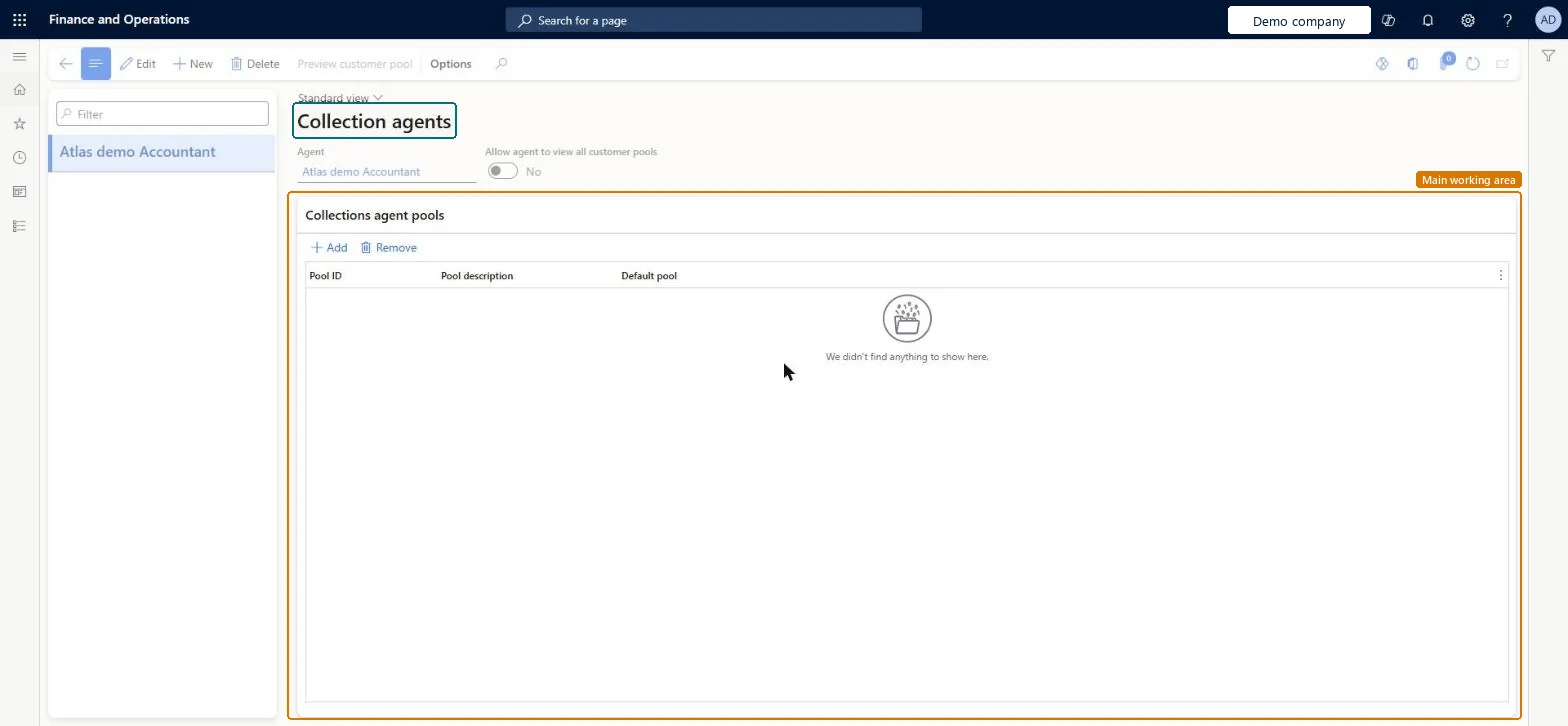
Collections agents

A setup page where workers are set up as collections agents and can be assigned customer pools.

Business process
Manage credit and collections
Menu item
CustCollectionsAgent
Data entity
DirPartyRelationshipEntity
Setup steps
1 on this page
Show what matters for
PAGE GUIDEWhat the page does and how to use it8 sections. Choose a role to highlight what matters to you.
Everyone

1What it is and why

What it isA setup page where workers are set up as collections agents and can be assigned customer pools.
What you do hereUse this page to give the people who collect payments their own customer pools so that each agent works with their own customers.
ExampleFor example, several collections agents can be assigned to a pool of customers US-001 to US-019, so each of them can see those customers.
Collections agents page in Dynamics 365
The page in Dynamics 365. page title tab to open what to set or check
Functional consultant · Solution architect

2Where it fits

End user · Functional consultant

3How to do it

About the examples: Examples and screenshots in this guide use BEAT, a demo company in a Dynamics 365 test environment. Use your own company's codes and values instead of copying them.

Setup steps on this page

Set up Collections agents

Use this page to give the people who collect payments their own customer pools so that each agent works with their own customers.

Steps from Microsoft

  1. Go to Credit and collections > Setup > Collections agents.
  2. Select the agent, and then select Add.
  3. In the Pool ID field, select the customer pool.
  4. Select or clear the Default pool checkbox.

Source: Microsoft Learn

Fields on the page

FieldWhat it meansTable column
Pool IDCustomer pool assigned to the agent.Microsoft Learn CustomerPoolId
Allow agent to view all customer poolsMakes all customer pools available to the agent, not only the assigned ones.Microsoft Learn AllowShowAllPools

Test checklist

  1. Select a Collections-type team in Accounts receivable parameters.
  2. Add a worker as a collections agent with one pool.
  3. Sign in as that user and open Aged balances; check only that pool is offered.
  4. Turn on Allow agent to view all customer pools and check all pools appear.

Source: Microsoft Learn

Functional consultant

4Setup decisions

Setup stepRecommended value and whyDecision, common mistake and test
Set up Collections agentsSelect your collections team in Accounts receivable parameters (Collections tab) first, then add each agent with only the pools they own. Select Allow agent to view all customer pools only for supervisors.Agents are added to the team selected in the parameters; if none is selected, a team named Collections is created automatically. Without the view-all option, an agent sees only the pools assigned to them.Adding agents before choosing a team, which creates an extra Collections team that then has to be tidied up.
Solution architect

5Design impact

Can it be undoneReversible: Agent records only control which pools appear in filters; changing them doesn't change any transactions. Microsoft Learn
If you change it laterIf no team is selected in Accounts receivable parameters, a team named Collections is created automatically and the agents are added to it. Microsoft Learn
Technical architect

6Technical

Menu itemCustCollectionsAgent Checked in Dynamics 365
FormCustCollectionsAgent Checked in Dynamics 365
Data entitiesDirPartyRelationshipEntityParty relationships Checked in Dynamics 365OMTeamMemberV2EntityTeam members V2 Checked in Dynamics 365
Roles to set it up and use itTo set it up or change itCollections manager CollectionLetterCollectionsManagerAccounts receivable manager CustInvoiceAccountsReceivableManagerAccounting supervisor LedgerAccountingSupervisorTo use itCollections agent CollectionLetterCollectionsAgentAccounting manager LedgerAccountingManagerFinancial controller LedgerFinancialControllerAccountant LedgerAccountantGive people one of these roles. On this system, 7 roles can open this page.Checked in Dynamics 365
Actions on the pageOptionsChecked in Dynamics 365
Developer

7Developer

Open it by URLhttps://<your-environment>/?mi=CustCollectionsAgent
Integrate withDirPartyRelationshipEntity data entity Checked in Dynamics 365
Everyone

8Sources