BeyondERP.Newsletter
Menu

Setup step on the Address setup page · Organization administration

Set up Address setup

Use this page to set how addresses are laid out for each country or region and which address values are checked when new addresses are created.

Used by
Information technology manager
Business process
Define address and location policies
Menu item
LogisticsAddressFormat
Main table
LogisticsAddressFormatHeading
Data entity
LogisticsAddressFormatEntity
Setup steps
1 on this page
Show what matters for
SETUP GUIDEHow to set it up8 sections. Choose a role to highlight what matters to you.
Everyone

1What it is and why

What it isA setup page for the postal address formats your organization needs, along with countries/regions, states, counties, cities, districts and ZIP/postal codes.
What you do hereUse this page to set how addresses are laid out for each country or region and which address values are checked when new addresses are created.
ExampleFor example, you can add an address format NO for Norway and set the order of its address parts and separators.
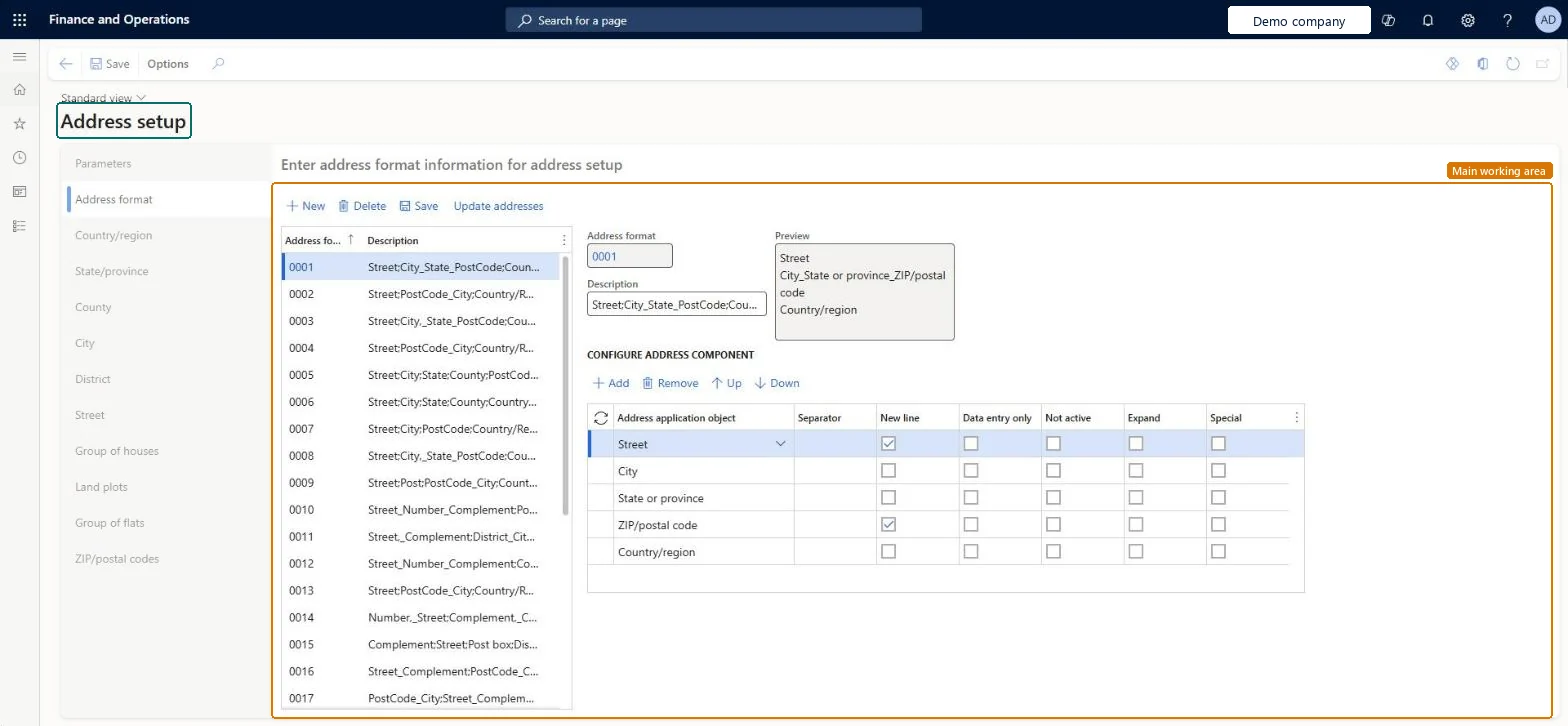
Address setup page in Dynamics 365
The page in Dynamics 365. page title tab to open what to set or check
Functional consultant · Solution architect

2Where it fits

Business processAdminister system features › Define address and location policies
Menu pathOrganization administration › Global address book › Addresses › Address setup
Related pagesImport ZIP/postal codes Microsoft Learn
In this processKeep one party per real organization or person
End user · Functional consultant

3How to do it

About the examples: Examples and screenshots in this guide use BEAT, a demo company in a Dynamics 365 test environment. Use your own company's codes and values instead of copying them.

Step by step, with screenshots

Set up Address setup1 screen

Use this page to set how addresses are laid out for each country or region and which address values are checked when new addresses are created.

  1. Screen 1

    Check an address format

    Go to Organization administration > Global address book > Addresses > Address setup

    1. Open the Address format tab
    2. Select the address format
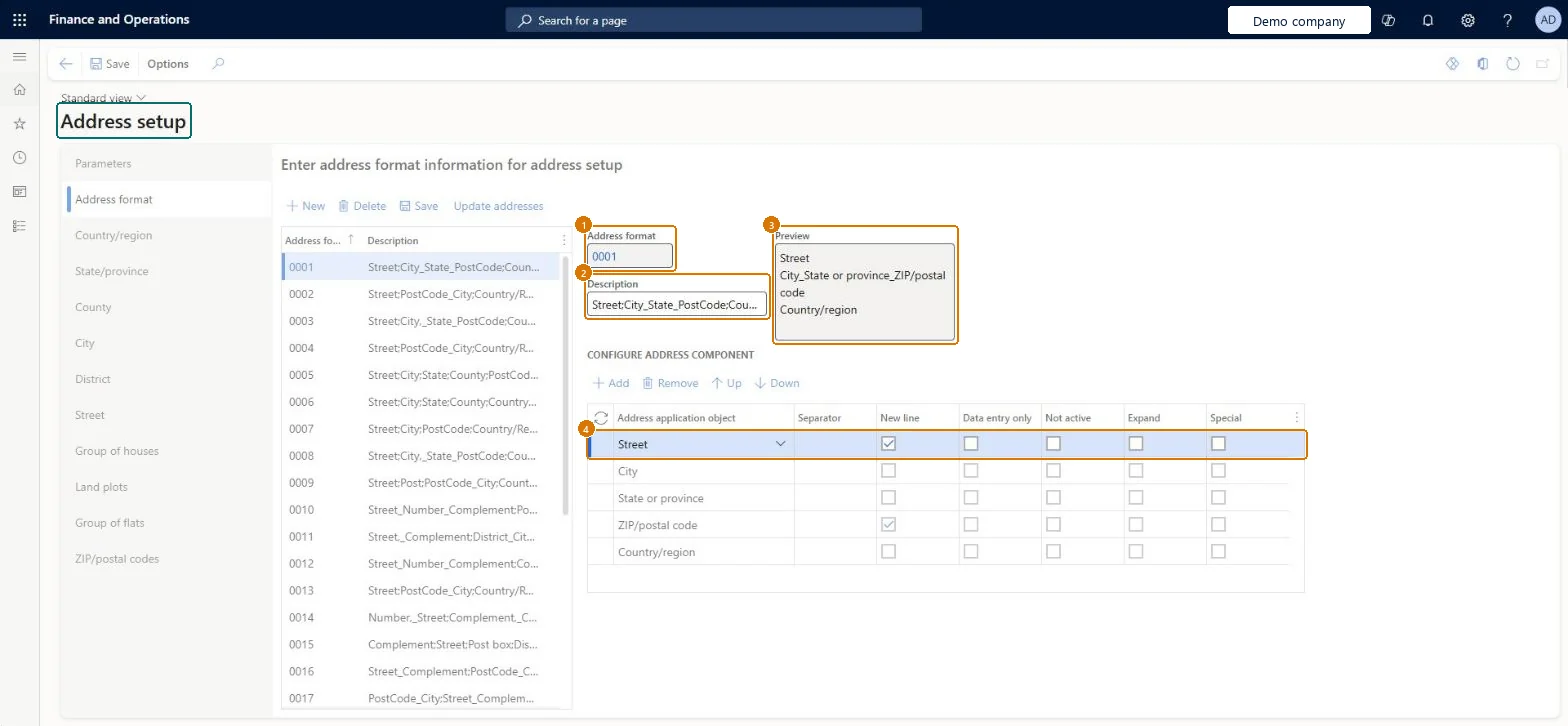
    3. Review its components, which starts a new line, and the preview
    1Address format0001
    2DescriptionStreet;City_State_PostCode;Country/Region
    3PreviewStreet / City_State or province_ZIP/postal code / Country/region
    Address application objectStreet (new line)
    Check an address format (zoomed on the outlined fields)
    Show the full screenCheck an address format
    page title tab to open what to set or check

Steps from Microsoft

  1. Go to Organization administration > Global address book > Addresses > Address setup.
  2. On the Address format tab, select New.
  3. Enter the address format name and a description.
  4. In the lower pane, select New to add an address component.
  5. In the Address application object field, select the address part, such as Street.
  6. In the Separator field, enter the character that follows it.
  7. Select New line, Data entry only, Not active, Expand or Special as needed.
  8. On the Country/region tab, select the address format for each country or region.

Source: Microsoft Learn

Fields on the page

FieldWhat it meansExampleTable column
Address application objectThe address part, such as Street, shown at this position in the format.Microsoft Learn Street (new line)Element
SeparatorThe character placed between this address part and the next.Microsoft Learn Separator
New lineStarts this address part on a new line.Microsoft Learn SeparatorCrLf
Data entry onlyShows the part only when the address is entered, not when it is printed.Microsoft Learn DataEntryOnly
Not activeLeaves the part out of addresses in this format.Microsoft Learn InActive
ExpandPrints the full name of the country/region, state/province or county instead of the code.Microsoft Learn Expand
Time zoneThe time zone of the country/region.Microsoft Learn
Use ZIP + 4 postal code validation rulesAllows only valid five-digit or nine-digit ZIP/postal codes.Microsoft Learn AddressUseZipPlus4
Default state/provinceMakes this state/province the default for the country/region.Microsoft Learn DefaultStateForCountryRegion
Address format0001
DescriptionA short description of the address format.Checked in Dynamics 365Street;City_State_PostCode;Country/Region
PreviewStreet / City_State or province_ZIP/postal code / Country/region

Test checklist

  1. Create an address format, add components with separators and New line, and check the Preview.
  2. Assign the format to the country/region on the Country/region tab.
  3. Turn on City validation, then create an address with a city that isn't set up and check it is rejected.
  4. Create an address with a set-up city and check it prints in the format shown in Preview.

Source: Microsoft Learn

Functional consultant

4Setup decisions

Setup stepRecommended value and whyDecision, common mistake and test
Set up Address setupTurn on validation for ZIP/postal code, City or District only for values you have fully loaded on this page; leave the others as free text.When validation is on, a new address must use a value that already exists in the address setup; when it's off the field is free text.Turning on City or ZIP/postal code validation before the codes are loaded: users can't create new addresses with values that aren't set up yet.
Solution architect

5Design impact

Shared or per companyShared: the same records are used by every legal entity. Microsoft data model
Can it be undoneReversible: Validation options can be switched on or off; they apply when new addresses are created.
If you change it laterWhen validation is turned on for ZIP/postal code, District or City, new addresses must use values already set up on this page. Microsoft Learn
Technical architect

6Technical

Menu itemLogisticsAddressFormat Checked in Dynamics 365
FormLogisticsAddressSetup Checked in Dynamics 365
TableLogisticsAddressFormatHeadingShown as “Address format” in Record infoKey field: AddrFormat, NameChecked in Dynamics 365
Data entitiesLogisticsAddressFormatEntityAddress format Microsoft data model
Who can open itPrivilegesMaintain postal address formats LogisticsAddressFormatMaintainView address formats for the postal address LogisticsAddressFormatViewDutiesInquire into address policies LogisticsAddressPolicyInquireEnable address process LogisticsAddressProcessEnableInquire into address reference data LogisticsAddressReferenceDataInquire
1 security roleInformation technology manager SysServerITManager
Checked in Dynamics 365
Roles to set it up and use itTo set it up or change itInformation technology manager SysServerITManagerGive people one of these roles. On this system, 1 role can open this page.Checked in Dynamics 365
Actions on the pageOptionsChecked in Dynamics 365
Developer

7Developer

Open it by URLhttps://<your-environment>/?mi=LogisticsAddressFormat
Integrate withLogisticsAddressFormatEntity data entity Microsoft data model
Data migrationLogisticsAddressFormatEntity (Address format): shared by all companies, in Microsoft's default template 010 - System Setup.Load order: Microsoft's default template 010 - System Setup loads Address format at execution unit 1, level 10, sequence 10. Lower levels load first, and entities at the same level load in sequence order.Microsoft Learn
Table definitionLogisticsAddressFormatHeading columns and relations Microsoft data model
Everyone

8Sources

To cite this step: OA-GAB-080, Set up Address setup. Beyond ERP Atlas Hub, 2026-11-11. https://www.beyonderp.cloud/atlas/step/OA-GAB-080