BeyondERP.Newsletter
Menu

Setup step on the Work policies page · Warehouse management

Set up Work policies

Use this page to set, for chosen work order types, inventory locations and products, whether warehouse work is created.

Used by
Warehouse planner, Warehouse manager
Business process
Manage warehouse operations
Menu item
WHSWorkPolicy
Main table
WHSWorkPolicy
Data entity
WHSWarehouseWorkPolicyEntity
Setup steps
1 on this page
Show what matters for
SETUP GUIDEHow to set it up8 sections. Choose a role to highlight what matters to you.
Everyone

1What it is and why

What it isA setup page where you define work policies that control whether warehouse work is created for chosen work order types, locations and products.
What you do hereUse this page to set, for chosen work order types, inventory locations and products, whether warehouse work is created.
ExampleFor example, a work policy can stop putaway work being created for finished goods reported at a specific location.
Work policies page in Dynamics 365
The page in Dynamics 365. page title tab to open what to set or check
Functional consultant · Solution architect

2Where it fits

Business processManage warehouse operations
Menu pathWarehouse management › Setup › Work › Work policies
In this process Set up Location setup wizard · Set up Container attributes
End user · Functional consultant

3How to do it

About the examples: Examples and screenshots in this guide use BEAT, a demo company in a Dynamics 365 test environment. Use your own company's codes and values instead of copying them.

Setup steps on this page

Set up Work policies

Use this page to set, for chosen work order types, inventory locations and products, whether warehouse work is created.

Steps from Microsoft

  1. Go to Warehouse management > Setup > Work > Work policies.
  2. Select New, then enter a name in the Work policy name field.
  3. On the Work order types FastTab, select Add and set the work order type, the work process and the work creation method.
  4. On the Inventory locations FastTab, select Add and set the warehouse and the location.
  5. On the Products FastTab, set the Product selection field to All or Selected.
  6. Select Save.

Source: Microsoft Learn

Fields on the page

FieldWhat it meansTable column
Work processTo apply a policy to several work processes of the same work order type, add a separate line for each work process.Microsoft Learn WorkProcess
Inventory locationsThe locations where the policy applies. A policy with no location is not applied to any process.Microsoft Learn

Test checklist

  1. Create a policy for Purchase orders / Purchase order item receiving (and putaway) with Work creation method Never.
  2. Add the receiving warehouse and location on Inventory locations and set Product selection to All.
  3. Receive a purchase order line at that location in the mobile app.
  4. Check that on-hand is updated at the location and no work exists for the order.

Source: Microsoft Learn

Functional consultant

4Setup decisions

Setup stepRecommended value and whyDecision, common mistake and test
Set up Work policiesWork creation method Never for receiving or production locations where goods are used in place, with every receiving location listed on Inventory locationsA work policy prevents putaway or picking work for the chosen work order types, locations and products, and it only applies at locations listed on the policy.Leaving Inventory locations empty. A policy without a location isn't applied to any process, and the same location can't be on more than one policy.
Solution architect

5Design impact

Shared or per companyPer company: each legal entity has its own records. Microsoft data model
Can it be undoneReversible: Policies are checked when work would be created; changes affect later receipts and reports as finished.
Technical architect

6Technical

Menu itemWHSWorkPolicy Checked in Dynamics 365
FormWHSWorkPolicy Checked in Dynamics 365
TableWHSWorkPolicyShown as “WORK POLICIES” in Record infoKey field: NameChecked in Dynamics 365
Data entitiesWHSWarehouseWorkPolicyEntityWarehouse work policies Microsoft data model
Who can open itPrivilegesMaintain work policies WHSWorkPolicyMaintainView work policies WHSWorkPolicyViewDutiesInquire into warehouse planning master data WHSWarehousePlanningMasterInquireRecord warehouse planning masters WHSWarehousePlanningMasterMaintain
2 security rolesWarehouse planner WHSWarehousePlannerWarehouse manager WMSWarehouseManager
Checked in Dynamics 365
Roles to set it up and use itTo set it up or change itWarehouse manager WMSWarehouseManagerWarehouse planner WHSWarehousePlannerGive people one of these roles. On this system, 2 roles can open this page.Checked in Dynamics 365
Developer

7Developer

Open it by URLhttps://<your-environment>/?mi=WHSWorkPolicy
Integrate withWHSWarehouseWorkPolicyEntity data entity Microsoft data model
Data migrationWHSWarehouseWorkPolicyEntity (Warehouse work policies): loaded for each company, in Microsoft's default template 400 - Warehouse management.Load order: Microsoft's default template 400 - Warehouse management loads Warehouse work policies at execution unit 1, level 30, sequence 10. Lower levels load first, and entities at the same level load in sequence order.Load first: the default templates at lower levels (System setup to General ledger)Microsoft Learn
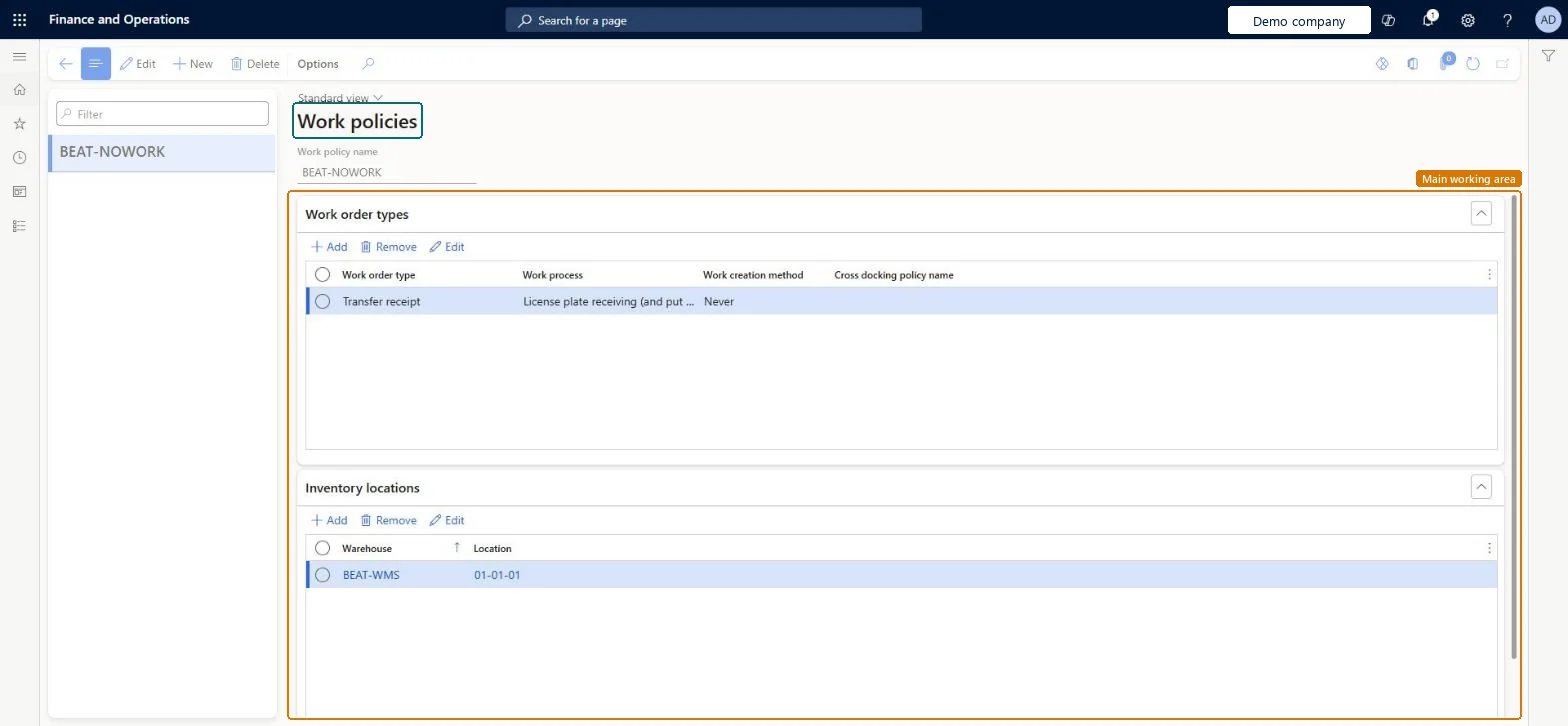
Table definitionWHSWorkPolicy columns and relations Microsoft data model
Everyone

8Sources

To cite this step: WM-WORK-030, Set up Work policies. Beyond ERP Atlas Hub, 2026-11-11. https://www.beyonderp.cloud/atlas/step/WM-WORK-030