Setup step on the Netting rules page · Accounts payable
Set up Netting rules
Defines the netting sequence, agreement scope, credit/debit note inclusion and criteria that automatic netting applies when run in batch or by process automation.
Accounts payable clerk, Accounts payable manager, Auditor and 15 more roles
Business process
Net payments between customers and vendors in Dynamics 365 Finance
Menu item
CustVendNettingRule
Main table
CustVendNettingRule
Setup steps
1 on this page
Show what matters for
SETUP GUIDEHow to set it up8 sections. Choose a role to highlight what matters to you.
Everyone
1What it is and why
What it is
A netting rule defines how customer and vendor balances are netted automatically.
What you do here
Use this page to set the netting sequence (by due date or invoice balance), the netting agreement scope, whether credit and debit notes are included, and criteria such as vendor accounts, customer accounts, or invoice currency, and then activate the rule.
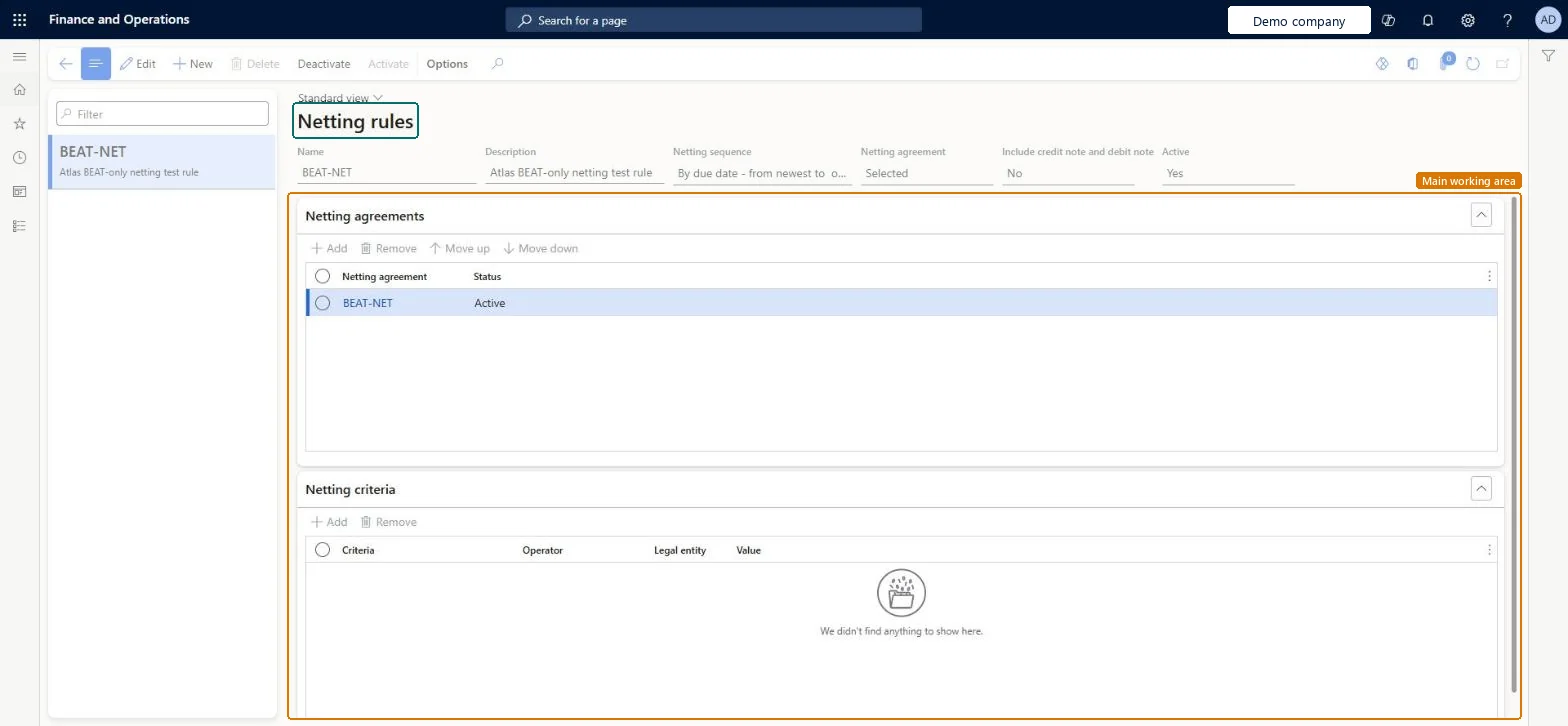
The page in Dynamics 365. page title tab to open what to set or check
About the examples: Examples and screenshots in this guide use BEAT, a demo company in a Dynamics 365 test environment. Use your own company's codes and values instead of copying them.
Step by step, with screenshots
Set up Netting rules5 screens
Defines the netting sequence, agreement scope, credit/debit note inclusion and criteria that automatic netting applies when run in batch or by process automation.
Screen 1
Create the netting rule
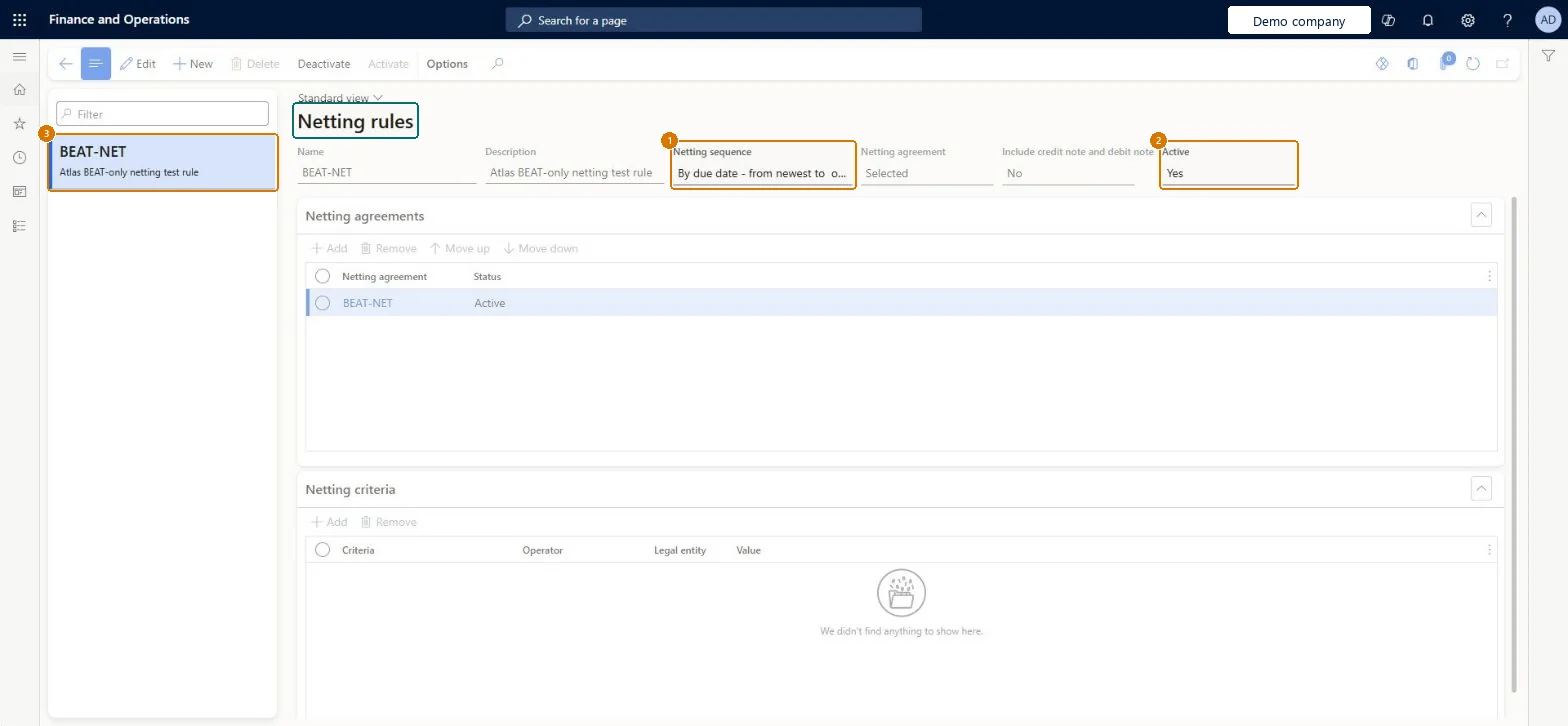
Go to Accounts payable > Payments > Netting > Netting rules
Select New and enter the Name and Description
Set Netting sequence
Set Active to Yes
1Netting sequence
By due date - from newest to oldest
2Active
Yes
3Name
BEAT-NET
Description
Same-party netting rule
Show the full screen page title tab to open what to set or check
Screen 2
Add the netting agreement to the rule
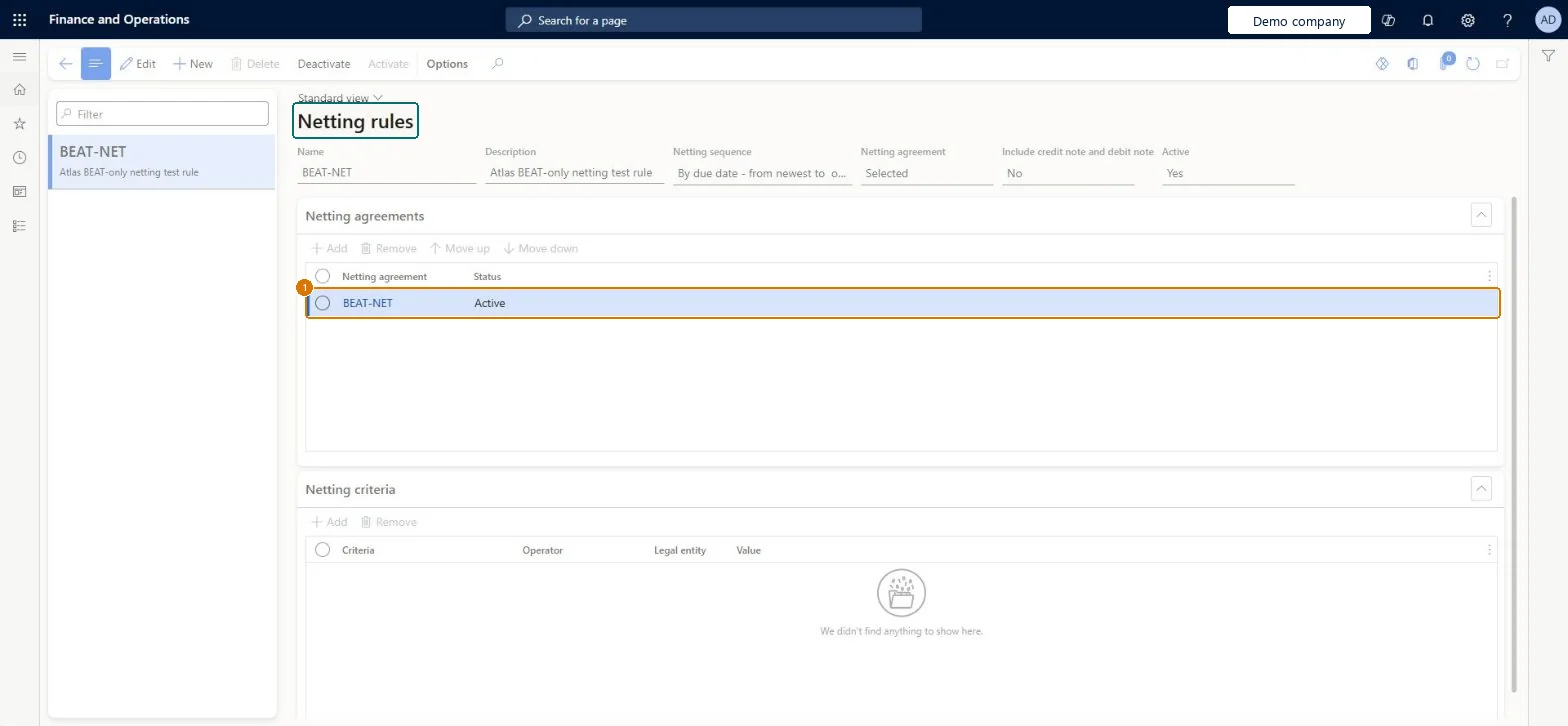
Go to Accounts payable > Payments > Netting > Netting rules, Netting agreements section
Select the BEAT-NET rule
In the Netting agreements section, select Add
Choose the BEAT-NET agreement
Leave Netting criteria empty
1Netting agreement
BEAT-NET
Show the full screen page title tab to open what to set or check
Screen 3
Confirm the rule selects the agreement
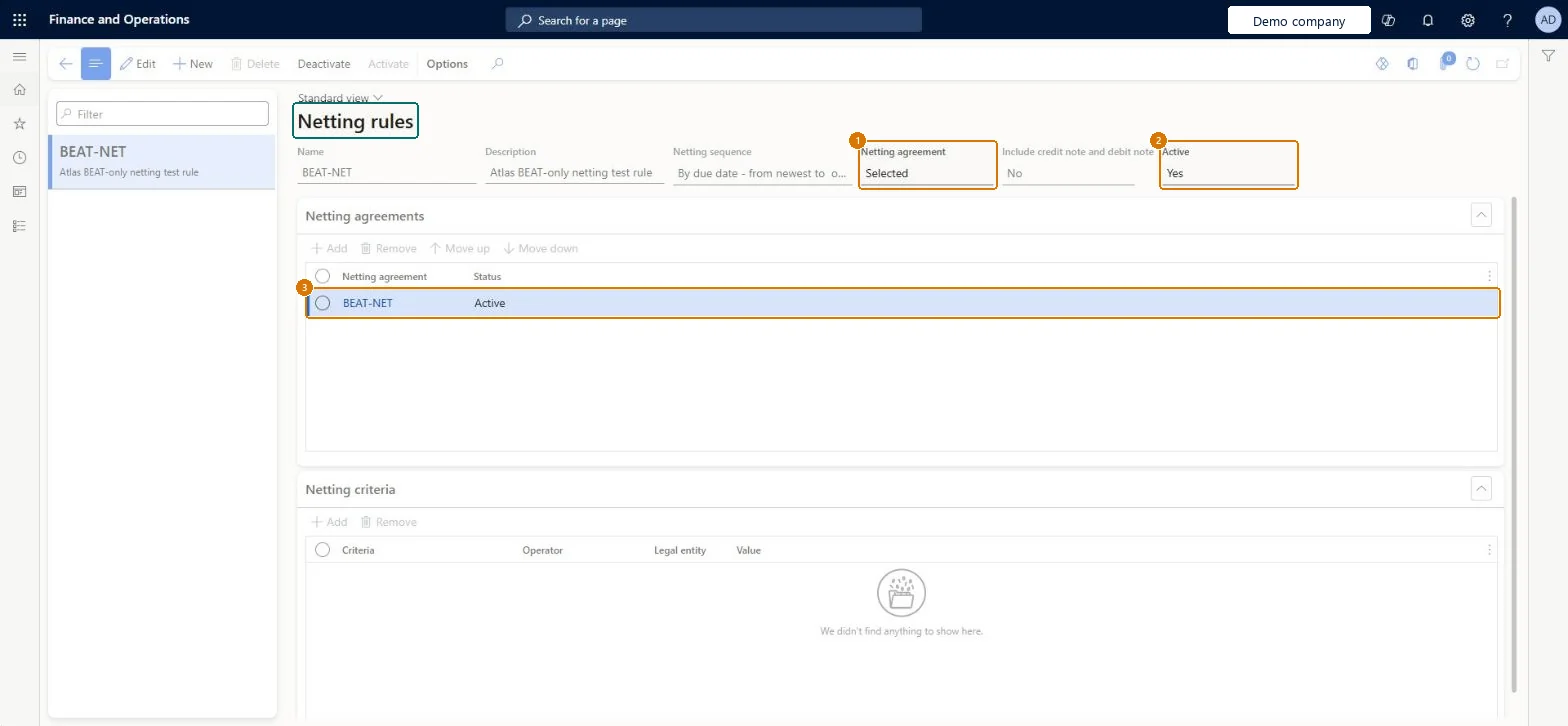
Go to Accounts payable > Payments > Netting > Netting rules
Select the BEAT-NET rule
Check Netting agreement, Active and the Netting agreements list
Check Rule BEAT-NET shows Netting agreement Selected and Active Yes, and its only agreement line is BEAT-NET with Status Active.
Show the full screen page title tab to open what to set or check
Screen 4
Run automatic netting with the rule
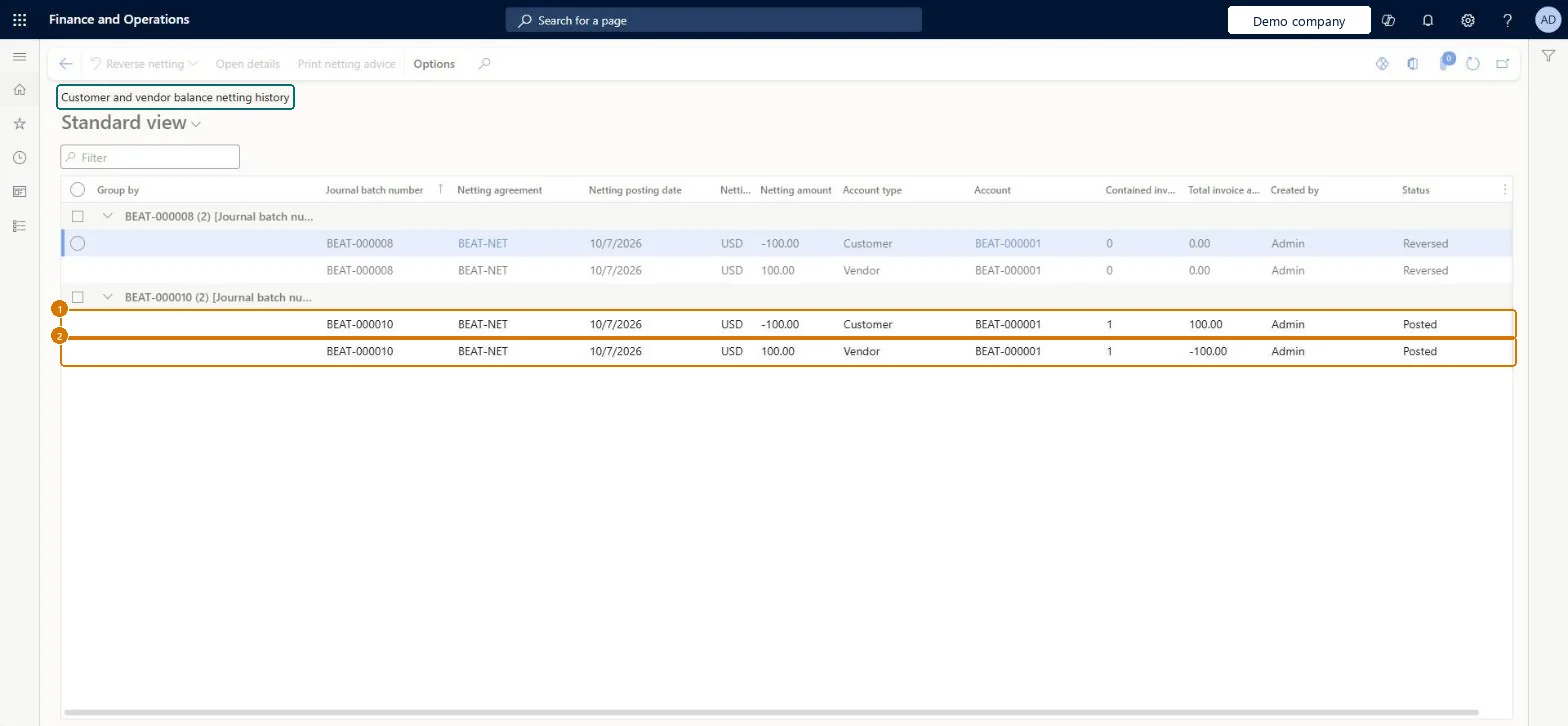
Go to Accounts payable > Payments > Netting > Customer and vendor balance netting, Netting history
Select Automatic netting
After it runs, select Netting history
Check Batch BEAT-000010 for agreement BEAT-NET, dated 10/7/2026, shows customer BEAT-000001 at -100.00 and vendor BEAT-000001 at 100.00 USD, one invoice each, with Status Posted.
Show the full screen page title tab to open what to set or check
Screen 5
Check the trial balance after rule-driven netting
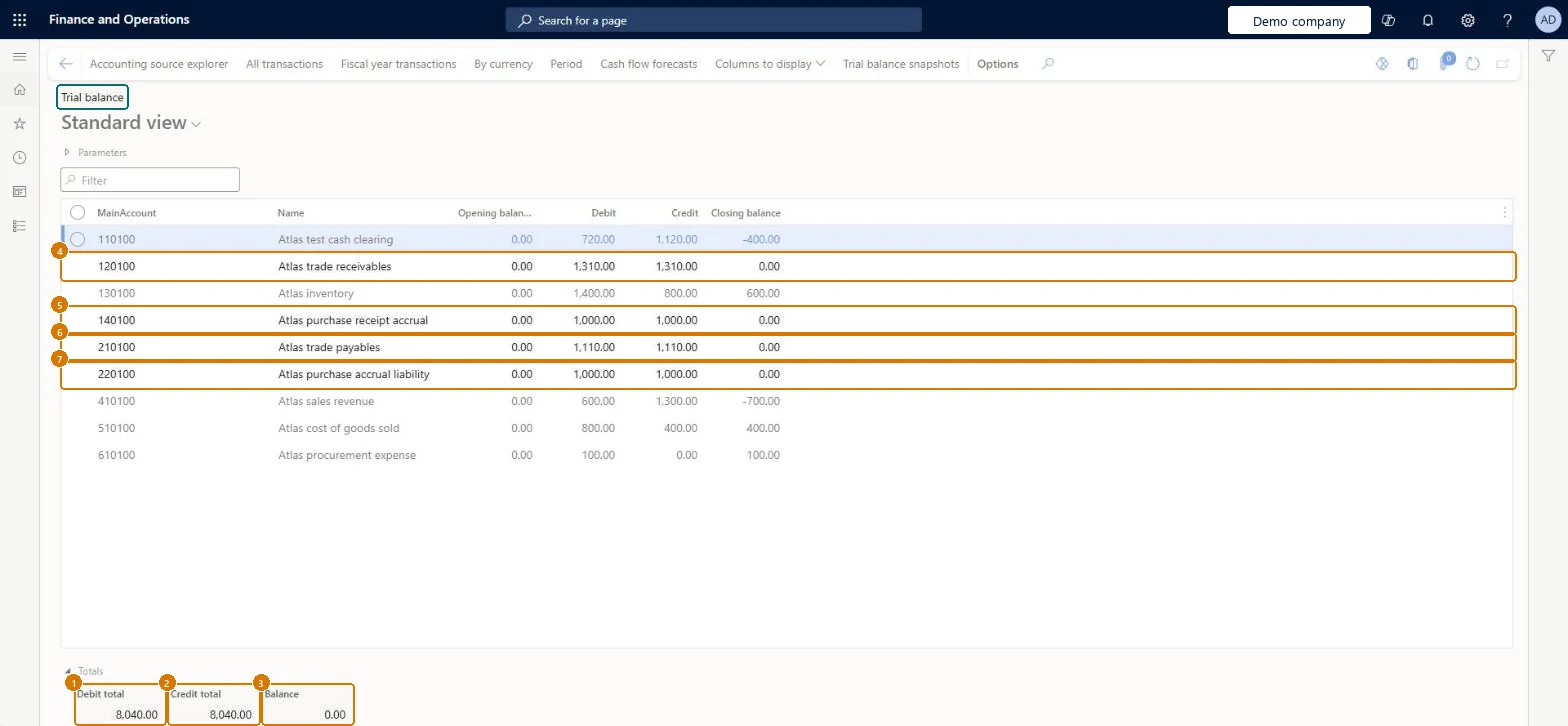
Go to General ledger > Inquiries and reports > Trial balance
Open the Trial balance
Check accounts 120100, 140100, 210100 and 220100 and the totals
Check Accounts 120100, 140100, 210100 and 220100 close at 0.00, and the totals are debit 8,040.00 and credit 8,040.00 with balance 0.00.
Show the full screen page title tab to open what to set or check
Steps from Microsoft
Go to Netting rules.
Create a record and enter a name and description.
Select a netting sequence.
Select the netting agreement scope: All, or Selected with a list of agreements.
Choose whether to include credit notes and debit notes.
On the Netting criteria FastTab, limit the rule to certain vendors, customers or currencies if needed.
Which netting sequence should automatic netting use?Leaving the rule inactive, or setting the netting agreement scope to All without checking which agreements are active: All includes every active agreement in the automatic run.
Solution architect
5Design impact
Can it be undone
Reversible: The rule only drives automatic netting runs; it can be changed or deactivated at any time, and posted netting can be reversed from Netting history.
Technical architect
6Technical
Menu item
CustVendNettingRuleChecked in Dynamics 365
Form
CustVendNettingRuleFormChecked in Dynamics 365
Table
CustVendNettingRuleShown as “Netting rules” in Record infoKey field: RecIdChecked in Dynamics 365
Who can open it
PrivilegesMaintain netting rule CustVendNettingRuleMaintainView netting rule CustVendNettingRuleViewDutiesInquire into invoice and cash policies CustInvoiceInvoiceAndCashPoliciesInquirEnable invoice and cash process CustInvoiceInvoiceAndCashProcessEnableInquire into customer payments status PaymCustomerPaymentsStatusInquireInquire into vendor payment status PaymVendorPaymentStatusInquireInquire into invoice and payment policies VendInvoiceInvoicePaymentPoliciesInquirEnable invoice and payment process VendInvoiceInvoicePaymentProcessEnable18 security rolesAuditor AuditPolicyManagerCollections agent CollectionLetterCollectionsAgentCollections manager CollectionLetterCollectionsManagerChief financial officer CompanyChiefFinancialOfficerAccounts receivable clerk CustInvoiceAccountsReceivableClerkAccounts receivable manager CustInvoiceAccountsReceivableManagerAccountant LedgerAccountantAccounting manager LedgerAccountingManagerAccounting supervisor LedgerAccountingSupervisorFinancial controller LedgerFinancialControllerAccounts payable centralized payments clerk PaymAccountsPayableCentralPaymClerkAccounts payable payments clerk PaymAccountsPayablePaymentsClerkAccounts receivable centralized payments clerk PaymAccountsReceivableCentralPaymClerkAccounts receivable payments clerk PaymAccountsReceivablePaymentsClerkRental coordinator agent RentalCoordinatorAgentRental manager RentalManagerAccounts payable clerk VendInvoiceAccountsPayableClerkAccounts payable manager VendInvoiceAccountsPayableManagerChecked in Dynamics 365
Roles to set it up and use it
To set it up or change itAccounts payable manager VendInvoiceAccountsPayableManagerAccounting supervisor LedgerAccountingSupervisorRental manager RentalManagerRental coordinator agent RentalCoordinatorAgentAccounting manager LedgerAccountingManagerTo use itAccounts payable clerk VendInvoiceAccountsPayableClerkChief financial officer CompanyChiefFinancialOfficerFinancial controller LedgerFinancialControllerAccountant LedgerAccountantAccounts payable payments clerk PaymAccountsPayablePaymentsClerkGive people one of these roles. On this system, 18 roles can open this page.Checked in Dynamics 365
Actions on the page
Options: Personalize, Page options, ShareChecked in Dynamics 365
Checked in a working Dynamics 365 system, version 10.0.49: the menu item, form, table and security, the page, the demo records and the values in the screenshots.
To cite this step: AP-PAY-040, Set up Netting rules. Beyond ERP Atlas Hub, 2026-11-11. https://www.beyonderp.cloud/atlas/step/AP-PAY-040