About the examples: Examples and screenshots in this guide use BEAT, a demo company in a Dynamics 365 test environment. Use your own company's codes and values instead of copying them.
Setup steps on this page
Set up Cross docking templates
Use this page to set the warehouses, planning rules and supply sources that apply to planned cross docking.
Steps from Microsoft
Go to Warehouse management > Setup > Work > Cross docking templates.
On the Action Pane, select New to create a template.
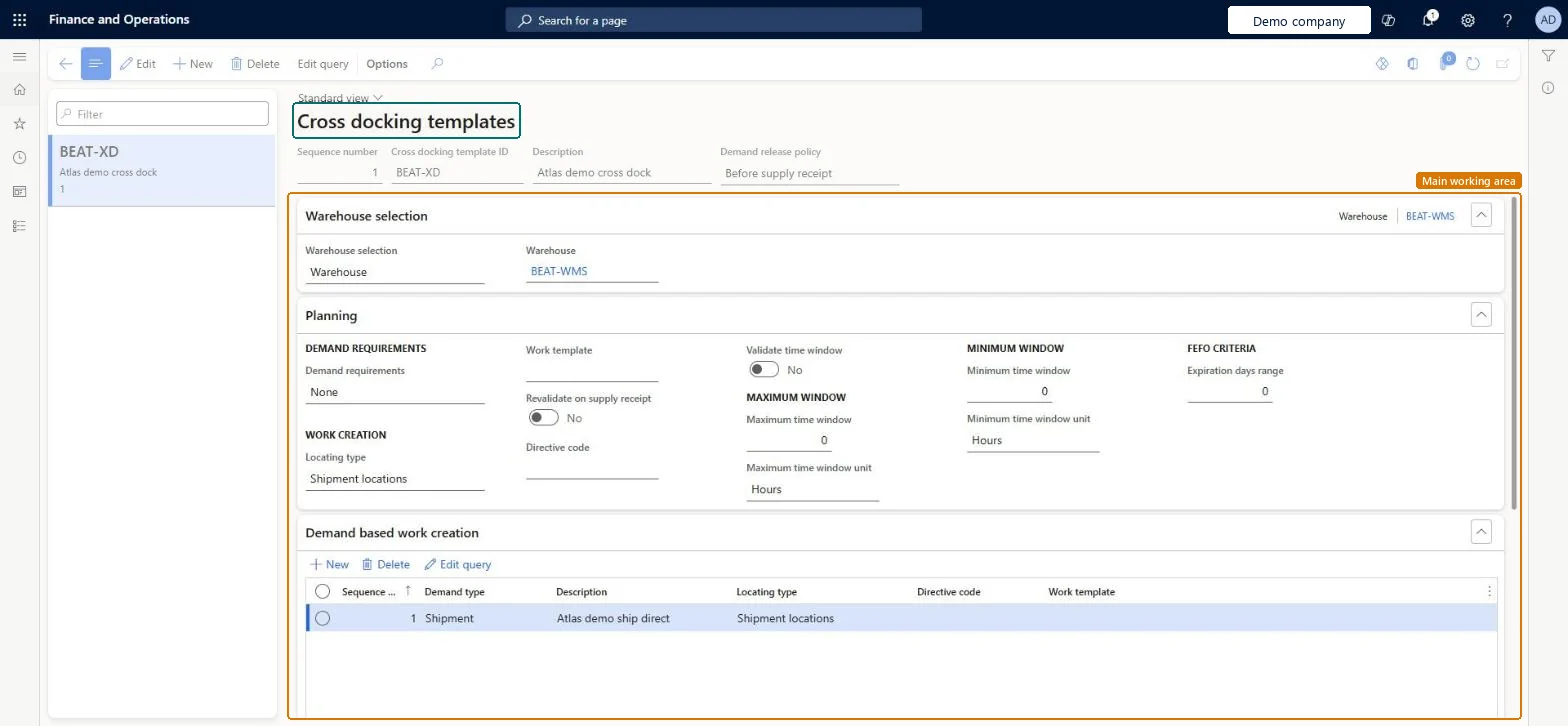
In the header, set the sequence number, the cross docking template ID, a description and the demand release policy.
On the Warehouse selection FastTab, specify the warehouse where the template applies.
On the Planning FastTab, set the demand requirements, locating type, time windows and the other planning options.
On the Supply sources FastTab, select New and set the supply source.
Reversible: Templates can be changed; cross-docking work already created stays, and cancelling it does not unregister inventory transactions. Microsoft Learn
Technical architect
6Technical
Menu item
WHSCrossDockingTemplateChecked in Dynamics 365
Form
WHSCrossDockingTemplateChecked in Dynamics 365
Table
WHSCrossDockTemplateShown as “CROSS DOCKING TEMPLATES” in Record infoKey field: CrossDockTemplateIdChecked in Dynamics 365
PrivilegesMaintain cross docking templates WHSCrossDockTemplateMaintainView cross docking templates WHSCrossDockTemplateViewDutiesInquire into warehouse planning master data WHSWarehousePlanningMasterInquireRecord warehouse planning masters WHSWarehousePlanningMasterMaintain2 security rolesWarehouse planner WHSWarehousePlannerWarehouse manager WMSWarehouseManagerChecked in Dynamics 365
Roles to set it up and use it
To set it up or change itWarehouse manager WMSWarehouseManagerWarehouse planner WHSWarehousePlannerGive people one of these roles. On this system, 2 roles can open this page.Checked in Dynamics 365
Actions on the page
(Action Pane without tabs): Edit queryChecked in Dynamics 365