About the examples: Examples and screenshots in this guide use BEAT, a demo company in a Dynamics 365 test environment. Use your own company's codes and values instead of copying them.
Step by step, with screenshots
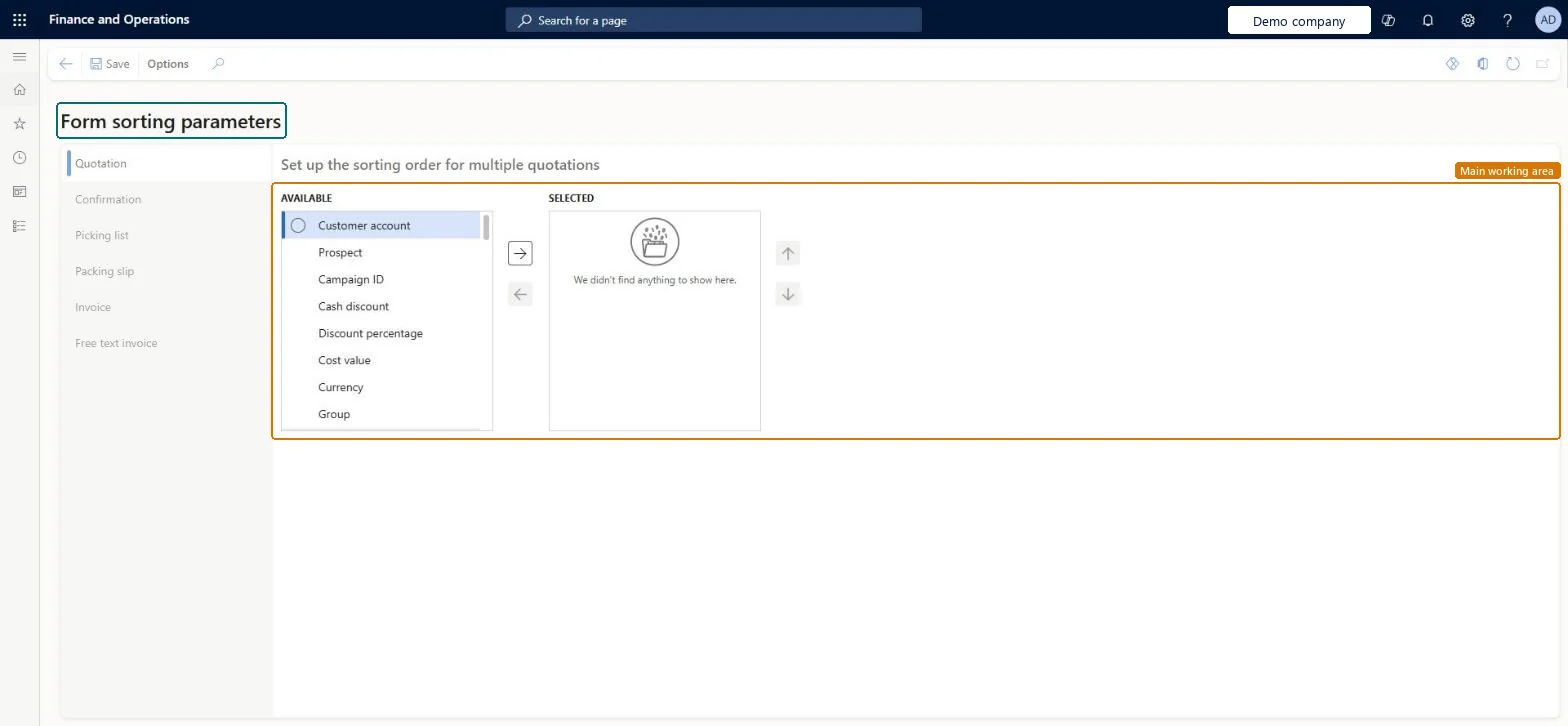
Set up Form sorting1 screen
Set up the sorting orders used when several invoices are printed together, for example by invoice account and sales order number.
Screen 1
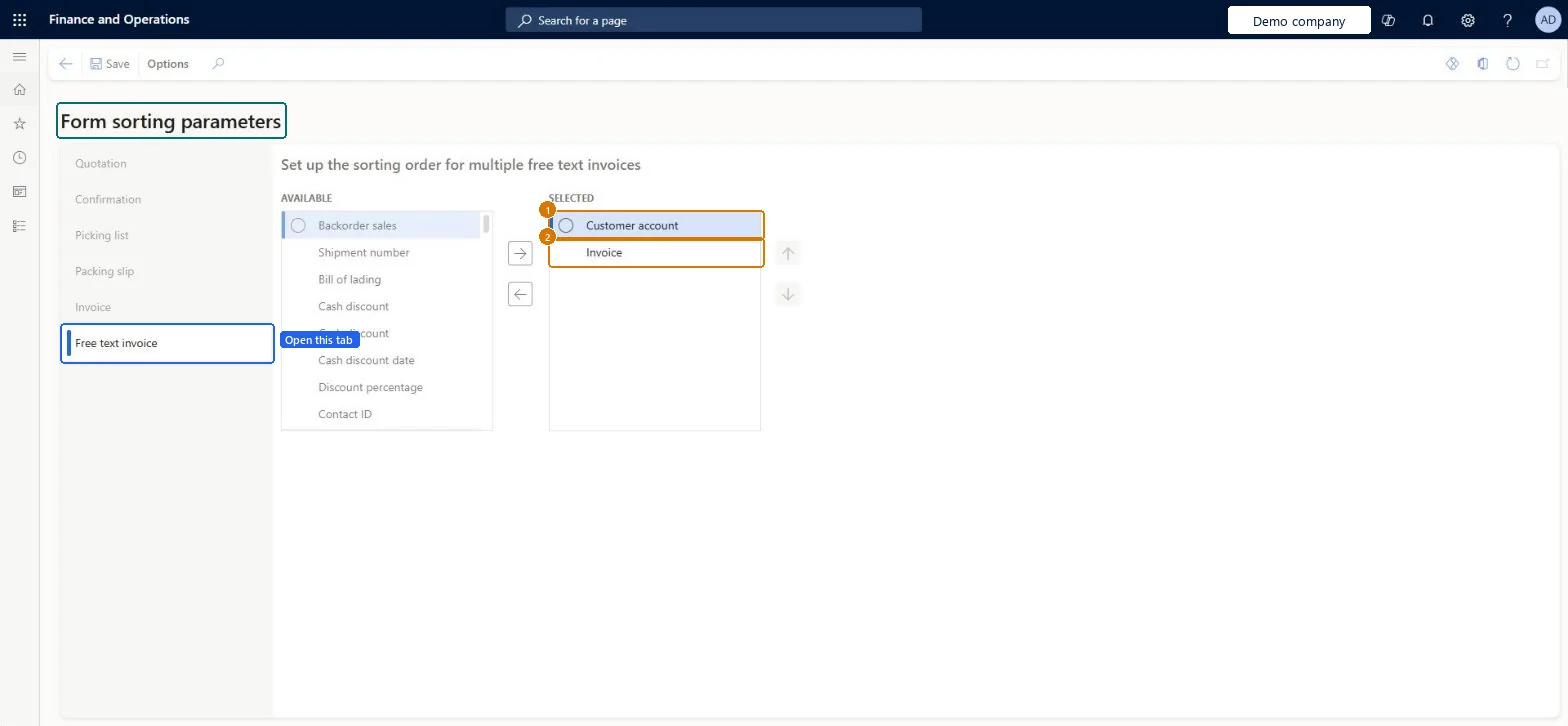
Set the free text invoice sort order
Go to Accounts receivable > Setup > Forms > Form sorting, Free text invoice tab
Open the Free text invoice tab
Move Customer account from AVAILABLE to SELECTED with the arrow
Move Invoice to SELECTED below it
Select Save
1SELECTED
Customer account
2SELECTED
Invoice
Show the full screen page title tab to open what to set or check
How to use it
Go to Accounts receivable > Setup > Forms > Form sorting.
Select a document tab on the left, such as Quotation, Confirmation, Picking list, Packing slip, Invoice or Free text invoice.
Select a field in the Available list, such as Customer account.
Select the right arrow to move it to the Selected list.
Use the up and down arrows to change the order of the Selected fields.
Select Save.
Source: Checked in Dynamics 365
Fields on the page
Field
What it means
Example
SELECTED
Customer account
Test checklist
Select a sort order such as invoice account and sales order number.
Post several sales invoices for different customers in one run, printing after all invoices are updated.
Check the printed invoices come out in the selected order.
Reversible: Form sorting only sets the order in which several invoices are printed, such as by invoice account and sales order number. It can be changed at any time and doesn't change posted data. Microsoft Learn
If you change it later
The sort order is followed only when documents are printed after all invoices are updated; documents printed during processing aren't sorted this way. Microsoft Learn
Technical architect
5Technical
Menu item
SalesFormLetterSortingParametersChecked in Dynamics 365
Form
SalesFormLetterSortingParametersChecked in Dynamics 365
Data entities
Sales form sorting parameters
Who can open it
PrivilegesMaintain the sorting of print sequence for sales order documents SalesFormLetterSortingParameterMaintainView the sorting of print sequence for sales order documents SalesFormLetterSortingParametersViewDutiesInquire into invoice and cash policies CustInvoiceInvoiceAndCashPoliciesInquirEnable invoice and cash process CustInvoiceInvoiceAndCashProcessEnableEnable shipping process InventShippingProcessEnableInquire into invoice and cash policies RentalCustInvInvoiceAndCashPolInquirEnable invoice and cash process RentalCustInvoiceInvAndCashProcEnableInquire into quotation to sales order policies RentalSalesQuotationToSlsOrdPoliciesInquireEnable quotation to sales order process RentalSalesQuotationToSlsOrdProcessEnableInquire into quotation to sales order policies SalesQuotationToSalesOrderPolInquireEnable quotation to sales order process SalesQuotationToSalesOrderProcessEnable15 security rolesAuditor AuditPolicyManagerCollections manager CollectionLetterCollectionsManagerAccounts receivable clerk CustInvoiceAccountsReceivableClerkAccounts receivable manager CustInvoiceAccountsReceivableManagerAccounting manager LedgerAccountingManagerAccounting supervisor LedgerAccountingSupervisorAccounts receivable centralized payments clerk PaymAccountsReceivableCentralPaymClerkAccounts receivable payments clerk PaymAccountsReceivablePaymentsClerkRental coordinator agent RentalCoordinatorAgentRental manager RentalManagerRental representative RentalRepresentativeRental sales manager RentalSalesManagerRetail service RetailServiceSales manager TradeSalesManagerWarehouse manager WMSWarehouseManagerChecked in Dynamics 365
Roles to set it up and use it
To set it up or change itRental manager RentalManagerAccounts receivable manager CustInvoiceAccountsReceivableManagerRental coordinator agent RentalCoordinatorAgentCollections manager CollectionLetterCollectionsManagerAccounting supervisor LedgerAccountingSupervisorTo use itAccounts receivable clerk CustInvoiceAccountsReceivableClerkAccounts receivable payments clerk PaymAccountsReceivablePaymentsClerkAccounts receivable centralized payments clerk PaymAccountsReceivableCentralPaymClerkAuditor AuditPolicyManagerRental representative RentalRepresentativeGive people one of these roles. On this system, 15 roles can open this page.Checked in Dynamics 365
Actions on the page
Options: Personalize, Page options, Edit, ShareChecked in Dynamics 365
Checked in a working Dynamics 365 system, version 10.0.49: the menu item, form, table and security, the page, the demo records and the values in the screenshots.
To cite this step: AR-SETUP-180, Set up Form sorting. Beyond ERP Atlas Hub, 2026-11-11. https://www.beyonderp.cloud/atlas/step/AR-SETUP-180