About the examples: Examples and screenshots in this guide use BEAT, a demo company in a Dynamics 365 test environment. Use your own company's codes and values instead of copying them.
Step by step, with screenshots
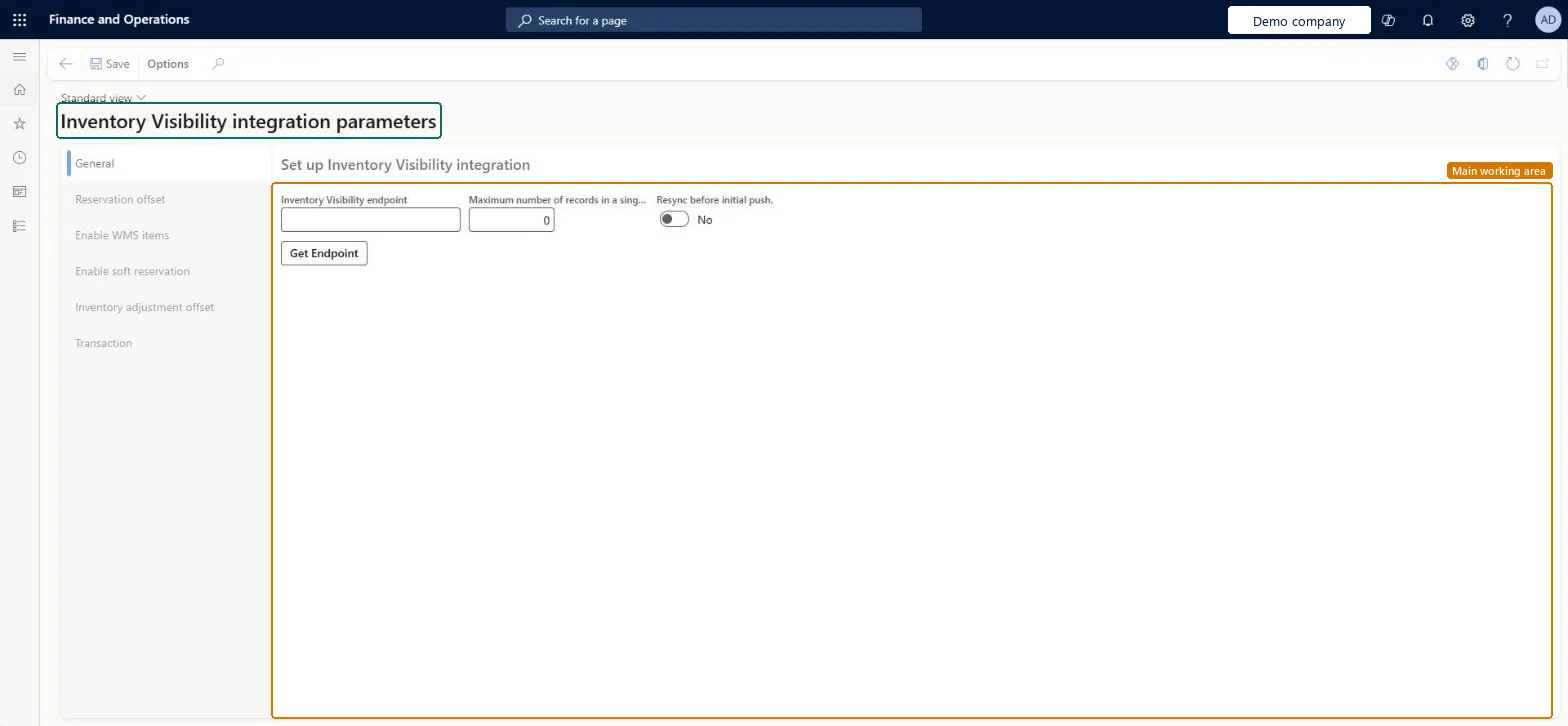
Set up Inventory Visibility integration parameters1 screen
Use this page to enter the Inventory Visibility endpoint and turn on features such as warehouse item sync and adjustment journal sync.
Screen 1
Set up the Inventory Visibility integration
Go to Inventory management > Setup > Inventory Visibility integration parameters
Make sure the Inventory Visibility add-in is installed for the environment
On the General tab, select Get Endpoint, or enter the Inventory Visibility endpoint
Optionally set the maximum number of records sent in a single request
Use the other tabs to turn on reservation offset, warehouse items, soft reservation and adjustment offset as needed
Select Save
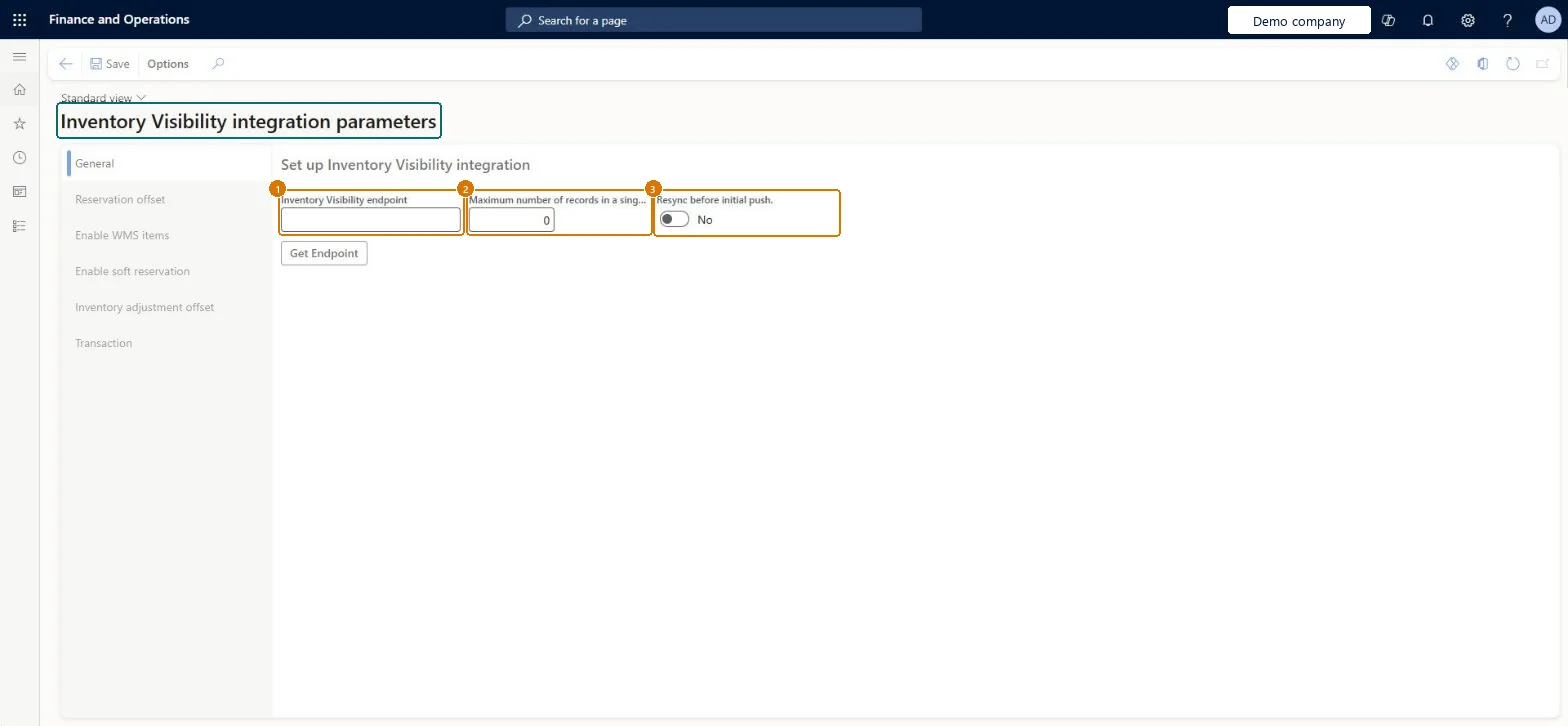
1Inventory Visibility endpoint
(blank until the add-in is connected)
2Maximum number of records in a single request
0
3Resync before initial push.
No
Show the full screen page title tab to open what to set or check
Steps from Microsoft
Turn on the Inventory Visibility integration feature in Feature management.
Go to Inventory management > Setup > Inventory Visibility integration parameters.
On the General tab, enter the Inventory Visibility endpoint.
Keep or change the Maximum number of records in a single request.
Set up any optional features you want to use.
Go to Inventory management > Periodic tasks > Inventory Visibility integration and enable the job.
The URL of the environment where Inventory Visibility runs.Microsoft Learn
(blank until the add-in is connected)
InventoryServiceEndpoint
Maximum number of records in a single request
The largest number of records sent in one request; the default is 512.Microsoft Learn
0
NumberOfInventsumInRequest
Enable WMS items sync
Syncs items that use warehouse management processes to Inventory Visibility.Microsoft Learn
Enable adjustment journal sync
Turns on syncing of inventory adjustments made through Inventory Visibility.Microsoft Learn
AdjustmentJournalEnabled
Resync before initial push.
Whether the next initial push first cleans up the older inventory data in Inventory Visibility and then sends the on-hand data again.Microsoft Learn
No
ResyncBeforeInitialPush
Common errors and fixes
Message
What to do
Cannot sync more than 500000 records in the same warehouse. To mitigate this issue, update partition schema to 2 in Inventory Visibility Add-in.
Delete all inventory data in Power Apps, change the partition schema to version 2 through the API, enable advanced warehouse inventory, update the configuration, then enable the integration job again. Microsoft Learn
Test checklist
Check the Inventory Visibility app is installed in the linked Dataverse environment
Enter the endpoint and keep Maximum number of records in a single request at 512
Enable the job at Inventory management > Periodic tasks > Inventory Visibility Integration
Post an inventory adjustment and check the on-hand change appears in Inventory Visibility
Inventory Visibility endpoint from the Power Platform environment; Maximum number of records in a single request left at the default 512Learn tells you to keep 512 unless Microsoft Support advises otherwise; the endpoint is the URL of the environment where Inventory Visibility runs.
Installing the add-in in several environments with the same Microsoft Entra application. Learn warns this causes a token issue and only the latest installation stays valid.
Feature management and licence
Feature to turn on
Inventory Visibility integration (Mandatory, on by default)
Licence or add-in
Inventory Visibility Add-in installed from Lifecycle Services or the Power Platform admin center
Reversible: Endpoint and optional features can be changed later. Disabling the Inventory Visibility Integration job stops posting changes; uninstalling the add-in deletes its cache but not the data already synced to Dataverse. Microsoft Learn
Technical architect
6Technical
Menu item
InventInventoryDataServiceParametersChecked in Dynamics 365
Form
InventInventoryDataServiceParametersChecked in Dynamics 365
Table
InventInventoryDataServiceParametersChecked in Dynamics 365
Roles to set it up and use it
To set it up or change itWarehouse manager WMSWarehouseManagerSales manager TradeSalesManagerMaterials manager InventMaterialsManagerGive people one of these roles. On this system, 3 roles can open this page.Checked in Dynamics 365
Actions on the page
Options: Personalize, Page options, Edit, ShareChecked in Dynamics 365
Checked in a working Dynamics 365 system, version 10.0.49: the menu item, form, table and security, the page, the demo records and the values in the screenshots.