BeyondERP.Newsletter
Menu

Job page · Credit and collections

Create interest notes

A periodic job that calculates interest on open customer transactions and creates interest notes.

Business process
Manage credit and collections
Menu item
action:CustInterestCreate
Show what matters for
PAGE GUIDEWhat the page does and how to use it7 sections. Choose a role to highlight what matters to you.
Everyone

1What it is and why

What it isA periodic job that calculates interest on open customer transactions and creates interest notes.
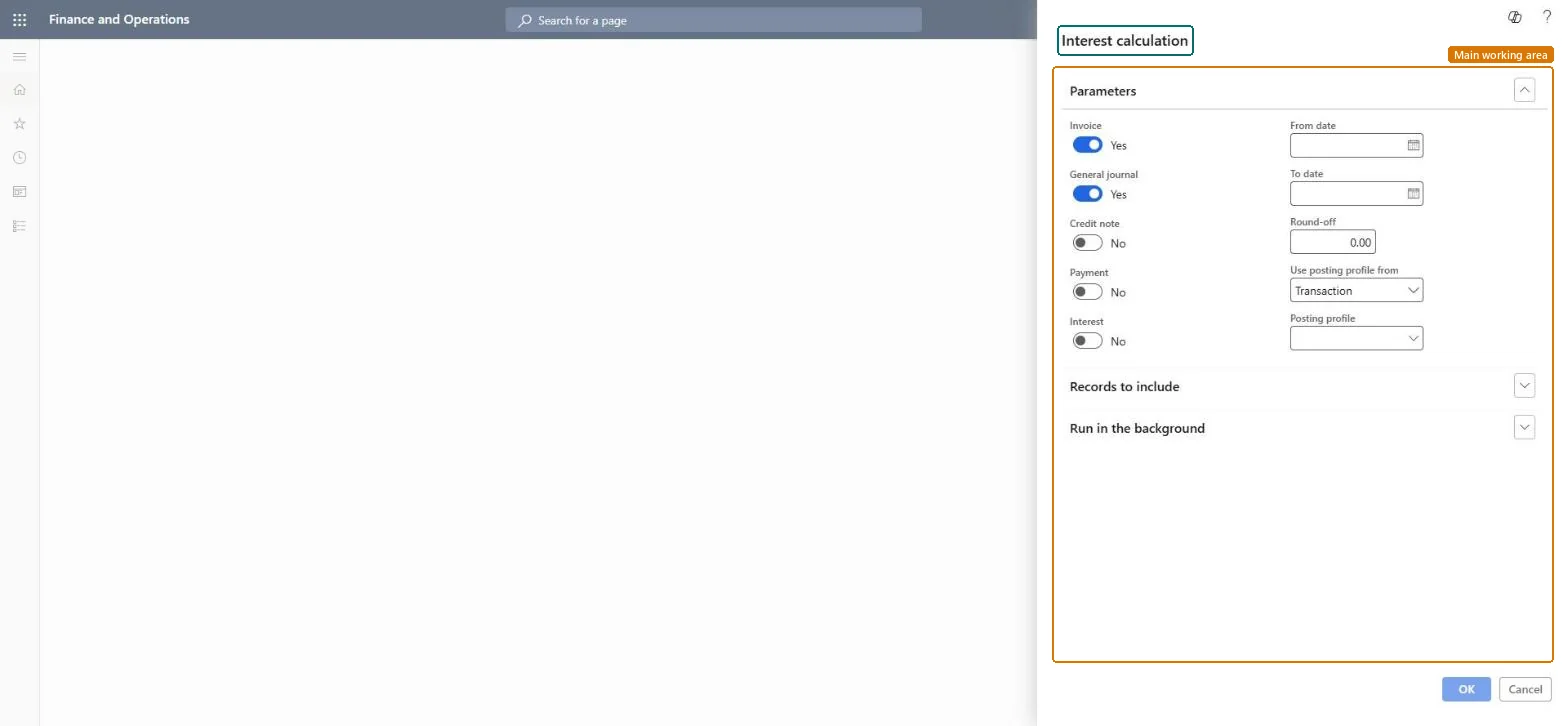
What you do hereUse this periodic task to calculate interest for a date range on the transaction types and customers you select, and to choose which posting profile the interest notes use.
ExampleFor example, you can create interest notes that only charge a fee, to remind customers of overdue charges without calculating new interest.
Create interest notes page in Dynamics 365
The page in Dynamics 365. page title tab to open what to set or check
Functional consultant · Solution architect

2Where it fits

Business processManage credit and collections
Menu pathCredit and collections › Interest › Create interest notes
Set up firstCustomer posting profiles Microsoft Learn Set up interest codes Microsoft Learn
Used next byReview and process interest notes Microsoft Learn
End user · Functional consultant

3How to do it

About the examples: Examples and screenshots in this guide use BEAT, a demo company in a Dynamics 365 test environment. Use your own company's codes and values instead of copying them.

When to run it

When to run itAt the end of each interest period, after customer payments up to the To date are posted.
How oftenOnce per interest period that your interest codes and policy define.
Batch settingsRun it in the background when you calculate interest for many customers at once.
What the output showsInterest notes with status Created for customers with overdue transactions of the selected types. A customer without a note usually has a posting profile with no interest code.

Source: Microsoft Learn

Steps from Microsoft

  1. Go to Credit and collections > Interest > Create interest notes.
  2. Select the transaction types to calculate interest for, and set Interest to Yes only if interest on interest is allowed where you operate.
  3. Enter the From date and To date. Without a From date, all unposted interest notes are canceled and interest is recalculated from the transaction date.
  4. In Use posting profile from, choose Account, Select or Transaction to decide which posting profile each interest note uses.
  5. In Records to include, select Filter and enter the customers to include.
  6. Open Review and process interest notes, set Status to Created, and check the amounts before you print and post.

Source: Microsoft Learn

Fields on the page

FieldWhat it means
InvoiceCalculates interest on invoices.Microsoft Learn
Credit noteDeducts customer credit notes before interest is calculated.Microsoft Learn
PaymentDeducts customer payments before interest is calculated.Microsoft Learn
InterestCalculates interest on earlier interest notes (interest on interest).Microsoft Learn
From dateDate from which interest is calculated.Microsoft Learn
To dateDate up to which interest is calculated.Microsoft Learn
Round-offUnit that the interest amount is rounded to.Microsoft Learn
Use posting profile fromWhether each interest note uses the customer's posting profile, a profile you select, or the profile of each transaction.Microsoft Learn

Test checklist

  1. Review and process interest notes shows new notes with status Created.
  2. The interest amount on a sample note matches the overdue amount, days and interest code.
  3. Customers whose posting profile has no interest code got no note.

Source: Microsoft Learn

Solution architect

4Design impact

Can it be undoneYes, before posting: Unposted interest notes are canceled when you run the job again without a From date. Once posted, the interest is on the customer account. Microsoft Learn
If you change it laterCreates interest notes; nothing is posted until you post them from Review and process interest notes. Microsoft Learn
Technical architect

5Technical

Menu itemaction:CustInterestCreate Checked in Dynamics 365
FormDialog Checked in Dynamics 365
Roles to set it up and use itTo use itCollections manager CollectionLetterCollectionsManagerCollections agent CollectionLetterCollectionsAgentGive people one of these roles. On this system, 2 roles can run this page.Checked in Dynamics 365
Developer

6Developer

Open it by URLhttps://<your-environment>/?mi=action:CustInterestCreate
Everyone

7Sources